Pages

Monday, January 26, 2015

Grandpa's Cookies

I got interested in learning more about my Danish great-grandfather, Waldemar Theodore Nelson, when I learned that his birthday was on our soon-to-be baby's due date. My dad had donated a big box of Waldemar Theodore's stuff to the special collections at the BYU library, so I went there to look through it and see what I could learn. He had such an interesting life! His first wife Caroline died a few weeks after giving birth to their second baby, but before she died, she asked her young, unmarried best friend Karen Marie (who was only 18; I don't think Caroline was much older) to take care of the baby for her. Karen took the baby to her own home and her mother helped her care for him. And a year later or so, Waldemar married Karen! I'm so curious about how that all happened; if they fell in love or if it started out as just a convenient arrangement, since she was already acting as his son's mother? They had 13 children together (one of whom was Andrew Nelson, my dad's dad) plus Caroline's two children that Karen raised, and I'm sure they grew to love each other eventually. But I would be so interested to know more! Unfortunately none of the journals covered that time period (and I doubt my great-grandpa would have written about his deep feelings even if they did! haha).

It was really interesting to read through some of his day-books and other records. He often wrote his "journal entries" (a few very short lines each day, just as my Dad always did for his journal) in between printed lines in old almanacs or on the flyleaves of old account books, I suppose because paper was scarce and he was being thrifty with what he had. Most days were quick descriptions of an unrelenting farm life, full of hard labor: "rained hard," or "got the wheat in"—but I liked this glimpse of a rare day of rest on December 27, 1910: "Wobling around not doing much of anything." Ha! Or this terse (but heartbreaking) summary on New Year's Eve of 1891: "1891 have been a hard old year Money have been very scarce." And another New Year's Eve entry, for 1890: "the year just pased have been a very eventfull one for Utah Much have been said about the President Manifesto in rezort to poligamy, real estate have taken a rise." I'm fascinated by how stoic and matter-of-fact it all is. Nothing about what he thought about polygamy or the change in policy! No unnecessary emotion! And yet of course, he felt emotions! I would like to know more about what he was thinking, but these small, laconic journal entries are intriguing in and of themselves. I looked at the entries for Christmas and birthdays, and they were mostly working days like any others, with maybe a nice meal or a church dance in the evening. That was interesting to think about. On his birthday, 15 February 1884, he wrote: "Had two games of pool with Tom Poulson, he won one game and I won one, that was all the birth day I had this time." That made me laugh! :)

I loved seeing the lines and lines of penmanship practice—rows of N's and L's and copywork of little moral sayings like "Good manners is the art of making those people easy with whom we converse. Whoever makes the fewest persons uneasy is the best bred in the company." I'm not sure how old he was when he did that, but he didn't move to the U.S. until he was about seven years old, so it may have been when he was learning English as an older child. It was so cute! I also found some recipes jotted down in his notebooks, which I copied down in my notes. One was for "Rolls" and was written as follows: "4 eggs 1 cup sug 1 cup flour 1 teaspoonful yeast powder. Spread with jelly and roll while hot." So interesting! It sounds like a kind of sweet roll but I can't quite imagine how it would work. You cook it in a flat pan like cake, maybe, before rolling it? And there was also this useful tidbit: "For sweaty feet apply boric acid two or three times a week."

When I told the children about Grandpa's recipes, they got really excited about the idea of trying out one of them ourselves. One recipe was just called "Cookies" and it looked really simple, so I said we could try it—but I warned the children that historical recipes often leave things out or assume things we don't know, so it might not work! Here was the recipe just as he wrote it:

"Cookies

1 1/2 cups sugar, 1 cup butter, 2 eggs, 3 tablespoons of cold water."

Hmm. No flour? Very odd. But we decided to try it anyway.

We wanted to make the recipe just as Grandpa would have, so of course we used a bowl and spoon instead of a mixer.

 
The cookie…batter? looked really weird, and I had my doubts about it. I really did not know if a cookie recipe without flour could work! But we pressed on.
 
There was nothing about oven temperature, of course (would they have cooked these in a wood stove?) so we guessed it at 375. After ten minutes in the oven, this^^^ is what we saw! Melted butter and sugar and eggs make…this liquid mess. It was very strange! We surmised that maybe Grandpa just forgot to write down the flour? Or maybe he just assumed the recipe reader would know to put it in?
 
We added some flour to the rest of the batter/dough, until it looked more like a traditional cookie dough. We maybe could have added even more, but after the addition of flour, we got cookies like this. Much better! They tasted delicious, too, and they were extra good because of being "Grandpa's Cookies." :)

Friday, January 23, 2015

Protein Synthesis Cookies Activity

This was probably our very favorite of this unit's activities. It was fun and it just seemed to really cement the idea of how proteins are formed into the children's memories.

An overview: In this activity, each pan with cookie dough in it is like a ribosome, where the synthesis of proteins takes place. The long chain of code on your paper is a strand of mRNA that codes for a specific protein. Each cookie topping is analogous to a different amino acid. Your hand (I guess?) is like the tRNA that goes and finds the right amino acid floating around in the cytoplasm and carries it back to be placed into the amino acid chain. And, when you are done placing all the toppings in the right order, the chain is analogous to a protein that can be released into your body to build tissue or carry out various other tasks.

And more background:

Now. Here are the instructions. First, pre-activity preparation. You need to make a code-breaker sheet for each child. This will show which codons (or sequences of three bases) "code" for which amino acids (represented here by the various toppings—chocolate chips, peanut butter chips, marshmallows, etc.). Besides codons for amino acids, you need a start and a stop codon. Just so the children would know them, I used the actual codons for these that our bodies use--AUG for "start," and UAG (among others) for "stop." Then I just made up the other codons. Here was our "code":
  • AUG—start
  • AGA—chocolate chip
  • GCC—peanut butter chip
  • AGC—white chocolate chip
  • UGU—sprinkle of cinnamon
  • CUG—sprinkle of coconut
  • AAA—chocolate kiss
  • CCA—peanut
  • GGU—sprinkle of rainbow sprinkles
  • AUU—marshmallow
  • UAG—stop

Next, write out the sequence of bases for each "protein." (Remember, proteins are chains of amino acids.) I made a different protein for each child (with a shorter one for Daisy to make it a bit easier for her). I included a sequence of "nonsense" at the beginning of each protein, representative of all the RNA that doesn't code for proteins in our chromosomes. I put in some nonsense at the end, after the "stop" codon, too.

I also made an answer key for myself, listing what the finished protein should look like for each child, so I could quickly check their work. (So for example, "3 chocolate chips, white chocolate chip, sprinkle of cinnamon, peanut, marshmallow, two peanut butter chips.")

And then, of course, you need to make your cookie pizza dough, and gather a bunch of different toppings. Here's the recipe for cookie pizza. We love it.
So, to do the activity, each child starts with a small pie pan and a handful of cookie dough. Press the dough into the pan about 1/2-inch thick. (Of course, you can press your dough in circles straight onto a cookie sheet, or even make a whole cookie pizza and let each child make his protein on a different section of the pizza. It's just easier for everyone to work at once when you use separate pans.)
Then, each child should look at his section of RNA code. Have him scan the sequence until he finds the start codon (AUG in our case). Circle the start codon. Then, with a pencil, make slashes or commas between each group of three bases after the start codon. (Don't divide the bases into groups of three before finding "start," or you might make your divisions in the wrong places and get totally different amino acids than you're supposed to! This does happen sometimes with DNA or RNA—it's called frameshift and can happen if a base is wrongly inserted to or deleted from the gene.) When you get to the stop codon, stop.

The next step is just transcribing each codon into its respective amino acid. So, with our example, if you saw "AGA," you would get a chocolate chip and place it onto your cookie. Line up the amino acids in the correct order, you can curl them around in a spiral or a wavy line if they won't fit in a straight line across your cookie (and this, too, is analogous to real proteins, as each protein has a specific shape which helps it do its job). When you get to a stop codon, you are done. 
Then bake your "protein" at 350 for 8 minutes or so (for small individual cookies) or 15-20 minutes (whole cookie pizza). Remove from oven when edges are just starting to brown. Cool and eat!
We had some extra dough, so we made a full cookie pizza also. We just let each person decorate a piece however they wanted to, but you could also do your mRNA transcription on a section of the pizza if you wanted to.

Wednesday, January 21, 2015

Inherited Traits chart

We had a fun time learning some genealogy as part of this unit. We asked the children's grandparents on both sides about some of their traits, and then tried to determine where we got some of our own traits based on that. 

From what we read, this is not really a very accurate way of looking at traits. I guess even the traits that are typically thought of as being determined by one gene (like attached vs unattached earlobes) , scientists are finding, are actually more complicated and less easily categorized than that. But, finding out if you can roll your tongue or not is a time-honored tradition in genetics classes, so we did this anyway. And we liked it. 

Here are some of the traits we surveyed (dominant traits are listed first):

  • Unattached vs attached earlobes
  • Can roll tongue into U-shape vs can't
  • No widow's peak vs widow's peak
  • Brown vs light (green or blue) eyes
  • Index finger shorter than ring finger vs opposite
  • Dark hair vs light hair
  • Non-red vs red hair
  • Curly hair vs straight hair

Monday, January 19, 2015

Family Traits activity

This was an activity I thought of to show how different combinations of traits can produce such differing results in siblings. There are several variations of this idea online, but nothing exactly like what I wanted, so I came up with this spreadsheet for our use. It's vastly simplified from real life, of course, but it was still fun to do.
We started out with a master list of alleles, and which were dominant and which were recessive.

Then I drew about eight different "parents." If Sam hadn't been so busy, I would have had him draw them, and then we would have had something worth sharing here. But since the focus was more on individual traits than a lovely artistic whole, it worked out okay. I made the parents very exaggated-ly have their phenotypes (big nose, hair color, etc.) and then I wrote their genotypes on the page so you could tell if they were homozygous or heterozygous.

Then we put tape on coins to show D for dominant and R for recessive. (You could just say "heads is dominant" or whatever, but actually putting the letters on helped make it more clear, I thought.)
Each set of parents had six "children." I made a spreadsheet with a list of all the alleles for each child, plus a place to write the genotypes and circle the phenotypes. Then there was a large space to draw the phenotypes for each child.

To make your "family," you would go through the following steps:
  1. Choose (at random) two parents from the "parents" pile.
  2. Flip a coin to determine the first child's sex. (E.g., assign female to heads/"D" and male to tails/"R")
  3. Check the genotypes of the parents. If either parent is homozygous dominant, write down one dominant allele for the child to inherit. If either parent is homozygous recessive, write down one recessive allele for the child. If a parent is heterozygous, flip a coin to see which allele the child will inherit. (So, if both parents are heterozygous, flip the coin twice to see which two alleles the child gets.)
  4. Once the genotype for the child is determined, circle the phenotype.
  5. Repeat steps 3-4 for each trait on the list.
  6. Draw what the child will look like.
  7. Repeat steps 2-6 for each child of these parents.

Even though it's a little bit involved, this isn't hard to do once you understand what you're doing. I had the children work in pairs so the bigs could help the littles, but everyone had fun flipping the coins and drawing the results.

Two related videos we enjoyed:


Friday, January 16, 2015

Punnett Square Cookies

Punnett Squares are fun. Cookies are even more fun. We got the idea to combine the two from this blog post.

Here are two videos that explain how to use Punnett Squares. Because we are very attached to bears after our bear unit, we also liked this Punnett Square showing how the white bears called "spirit bears" come by their white coloration.

For this activity, I just made our favorite chocolate chip cookie dough recipe, and left out the chocolate chips. Then, for the chocolate dough, I made another batch of the same dough and added 1/2 cup of cocoa to it instead of 1/2 cup of the flour. Sugar cookie dough, obviously, would work fine too, but we quite liked the flavor of these.
One of the things I liked about this activity was how well it demonstrated the idea of the dominant allele "masking" the recessive allele. If you take a ball of light dough and a ball of dark dough (representing the two forms of the gene), and mix them together (just squish them around until they are combined), you can see that the resulting phenotype is dark, just like the original dominant allele.
After trying that, though, we didn't actually mix the two alleles together. We just left both alleles showing in our Punnett squares, so we could see the genotypes and not just the phenotypes.
And when we had finished filling out the Punnett squares, we mixed the dough together somewhat randomly to make the cookies. It resulted in some nice marbling. :) Fun!

Mitosis Cupcakes

Here is a good video about Mitosis.

This was a really simple activity, but a fun review after learning about mitosis. We were inspired by this picture here. I put the children into teams (one older and one younger child together) and each team had to show each step of mitosis on a cupcake "cell". We used colored frosting in a plastic bag with the corner cut off to pipe on the yellow frosting, and we used chocolate sprinkles to make the chromosomes. (I guess the middle two steps are kind of a zoomed-in view of just the nucleus, really.)

Everyone especially liked the splitting cell in telophase. It does look especially cute, for some reason.

Wednesday, January 14, 2015

DNA Replication Activity/Snack

I bet someone could come up with a better version of this activity, with foods that fit together more…naturally? I felt like there were things that would go perfectly together (like, I don't know, olives and fingers :)) but I just couldn't think of what they were! Anyway, I wanted the children to demonstrate the way DNA "unzips" and replicates, so I came up with this snack/activity. 

Before you start, learn about how DNA replication works. We really liked this video showing the process.
Then, you need four different snack foods to be your "bases". They should fit together in pairs somehow. I used square pretzels and square soda crackers for one pair (Adenine and Thymine, perhaps) and elliptical wheat crackers and slices of cheese for the other pair (cytosine and guanine, say). I tried to cut little semi-circle-shapes out of one side of each piece of cheese, so the cheese and the crackers would fit together like puzzle pieces. (Just to demonstrate more visually that they were meant to fit together.) You put a bunch of each of these "bases" onto a tray to represent the bases that are floating around free inside the cell's nucleus.
Next, for each child, I made a little tray holding one "strand of DNA." It had several base pairs lined up to make a strand (or a gene, perhaps).
Then I just had each child show me what would happen as the DNA replicated. They had to "unzip" or slide the strand apart, and then find the matching bases to complete each side of the unzipped strand. When they were done, they could see how their new DNA strand was an exact copy of the original. And then, of course, they could eat it. Yum! :)

Monday, January 12, 2015

DNA structure/ Making DNA bead necklaces

We absolutely loved making these DNA models with seed beads. In fact we liked it so much that I ended up going back to the store and getting more bead colors so we could all make a bunch more of them on subsequent days. They were just fun to make! And easy enough that, once we got the hang of it, even 5-year-old Daisy was able to do it on her own. (Although, admittedly, Daisy always has been unusually good at—and had a lot of patience for—fine motor activities.) The instructions we used are here. I found I only needed to go through about three rows with the children before they could do it totally independently.
The nice thing about these models is that they are quite accurate, though simple, and they really get across the idea of the matching base pairs. And, if you accidentally pair the wrong bases—just call it a mutation! :) Sebby made quite a few mutations on purpose in his keychains, each causing a different trait ("This one made me have red eyes! This one means I have six fingers!" etc.).

Here is a great overview video that talks about the structure of DNA.

We made both keychains and necklaces out of our bead-DNA. I think the necklaces are so beautiful! The double-helix shape can be flattened if you aren't careful, but it's easily re-twisted if necessary.

To make these, you just need two colors of seed beads in size 6/0. These will make up the sugar/phosphate "backbone" of the DNA's double helix.

And you need two colors of longer bugle beads in size #3. We used the twisted bugles because they are sparkly and pretty. :) These will be your C,T, G, A bases, so before you start, decide which colors will always pair with each other:

 Then you just need some 32-gauge wire:
Then follow the step-by-step instructions here.

Happy makers. As I said, we couldn't get enough of this. It's very relaxing to sit around stringing beads and talking.
Malachi made keychains and necklaces for all his friends in his church class. So cute.
Daisy's pretty necklace
This was my favorite set of colors. I kept one of these to wear myself! I love it.

Friday, January 9, 2015

Extracting DNA from Lentils

Abe adding the cold alcohol layer

Surprisingly (to us, anyway), it's not hard to extract DNA from many types of plant and animal cells. You can find the very simple instructions here. It's pretty cool to see those long stringy white strands and realize that that stuff is actually DNA! We extracted ours from lentils, since that's what the link described. But it sounds like pretty much anything can work. And if you want to see your own DNA, you can extract some from your saliva--instructions here.

I wasn't sure if the contact solution had to be the special "protein removing" type, so we used pineapple juice for our enzymes, and that worked fine. But, based on other tutorials I've seen, the process really is not fussy--it looks like any type of contact solution will work also.

The stringy stuff floating up at the top is the DNA!

Wednesday, January 7, 2015

Plant and Animal Cells through the microscope

We started this unit with an overview of cells: their structure and composition, and how they work. This was a bit of a review, since we talked about the structure of neurons quite a lot during our nervous system unit. It was interesting to see how, even though the basic parts are the same, the different types of cells in the body can look (and function) so different(ly) from each other! We just learned very briefly about what the organelles do, since that wasn't really the focus of this unit. We did get more in depth about the ribosomes and the nucleus later, as we talked about DNA replication and protein synthesis.
Skin cells at two levels of magnification
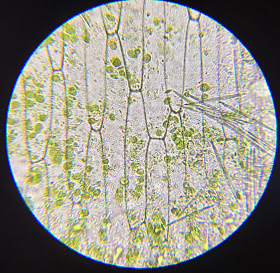
Leaf cells (not sure what kind of leaf it was) :)

I remember, very fondly, making a cookie model of a cell in 9th grade Biology, and sometime maybe if we have a unit on just cells, we'll make models too. But I decided against it this time since, again, that wasn't really the main focus. However, I did think it would be very useful to see some cells and get an idea of how they make up all living things, so we got out the microscope and looked at some plant (onion, carrot, leaf) cells, and some animal (skin, blood) cells. We were amazed how much we could see with just our small microscope!
We used some fountain pen ink to dye the onion skin cells, and that was cool. The cells are so neat and orderly! You can see how much structure the cell walls provide. And we were pleased to be able to see the nuclei so clearly with the ink dye.
We also were surprised to see the chloroplasts moving around in and between leaf cells (shown in the video above)! We learned that chloroplast movement helps transport proteins in and between cells, and also allows the chloroplasts to get better access to sunlight, so they don't get stuck somewhere shady and become unable to make chlorophyll. Pretty amazing to watch it happening.
Blood cells—a bit blurry
The blood cells were really interesting too. They were moving around right at first, but the blood dried quickly and then they didn't move. We only looked at blood in the first place because I accidentally cut myself on one of the microscope slides, but then it was so cool that we wished we could look at more of it. I tried to poke myself with a pin but no matter how hard I tried, I just couldn't draw blood! I wished I had one of those poker things they use for your finger when you go back donate blood. We didn't think we saw any white blood cells (although that might be one near the top right edge?), and we would have liked to find some, so we'll be looking for another opportunity next time someone gets hurt around here. :)

Monday, January 5, 2015

DNA and Genetics Unit Schedule and Lesson Plan

 
This was a good unit to do right before our new baby was born, because it gave us lots of chances to talk about who we really are and how much our genes determine what we are like. It was a good time to review some biology basics that we learned last time we had a baby, during our Babies Unit. And it was fun to talk about family traits (both inherited and learned), talk about baby names, tell stories about each of the other children's births, and learn some stories about our ancestors.
 
We really loved the YouTube videos by the Amoeba Sisters. They have very clear explanations of the information, and they're cute and funny too. Really well done. I've linked most of them on the specific post that's most relevant, but I'll put some of the links here as well:
 
 
We also liked this video about Gregor Mendel and his pea plants
 
And this video about sex determination in different organisms was fascinating!
 
This movie was pretty good, about mapping individual genomes and potential cures for genetic diseases