Thursday, April 30, 2015

Robot Celebration

Our robot celebration was one of our best ever—if I do say so myself. :) I am not much of a "party planner" so the bar was set very low, but we had so much fun! The older boys made themselves into robots out of old boxes we had lying around. They went around talking in robot voices and it was very cute. They also printed out a bunch of pictures of our favorite robots, and hung them up to make a "Wall of Robots" in the kitchen.
Half the fun was getting ready for the party. We made a few box robots as decorations.
I had Abraham help me make these little tin-can robots for all the other children. We used them to hold silverware at dinner, and then the children used them for keeping various little treasures in.
Malachi drew some robot pictures to put up on the wall.

If you search "Robot Party" on Pinterest, you will find tons of great party ideas, nearly all of them more beautiful and elaborate than I felt confident trying to re-create. But a common theme was a "Build-a-bot" station where the children could make robots out of various things. Sometimes they used rice crispie treats as a base, or sandwiches, or whatever. We decided to use toothpicks and marshmallows and a few little candies as the robot components:
The children made some cute robots.

We had a good robot-y dinner based on other ideas from pinterest. To be specific:
  • Pineapple Smoothie or "motor oil"
  • Screw-shaped pasta with mizithra cheese
  • Small corn chips or "microchips" (the mini chocolate chips we used to "build-a-bot" were even smaller, so we called those "nanochips" :))
  • Cheez-its crackers or "washers"
  • Almonds or "nuts." I saw lots of "nuts-and-bolts" trail mix/chex mix ideas, but the crackers really look more like washers than bolts, don't they?
  • Peas or "fuel cells." This one is the weak link since they don't really look much like batteries. But maybe like those small button kind?

And this grand robot donut "cake" for dessert! We thought he was so funny and cute. I got the brilliant idea here.

We watched "Big Hero 6" after dinner, and I made one of these little slinky "robots" (as pictured here: no instructions, but easy enough to figure out) for each of the kids. (You can get a bunch of slinkies fairly cheaply here.) They ate their rolos and mints and tic-tacs during the movie and thought it was the most exciting day ever.

Other movies we considered: "Wall-E" and "The Iron Giant." But we loved "Big Hero 6."

This was an awesome unit! We learned so much, and we didn't want it to end!

Friday, April 24, 2015

Cool Robot Videos

Here are some videos we enjoyed of various types of robots.

Funny little robo-footstool that comes to get under your feet.

This homemade robot talks and answers questions.

Tiny snow-plowing robot.

This one is a gas-sampling robot.

Robotic hand with Arduino.

Ping-pong robot!

This one is really cool, made with a box and Arduino.

Robot exoskeleton

And another exoskeleton suit, built in Utah!

A cute little baby penguin robot! Daisy loved this one.

This origami robot is great—he folds himself up and walks away!

We really loved the "BEAR" (battlefield extraction-assist robot) that's been developed for use in the armed forces. It can carry injured soldiers off the battlefield and disarm weapons, among other things. Here are three videos showing how it works:
An overview
Part 1
Part 2

ASIMO is another of our favorite robots. He's so cute! Here are some ASIMO videos:
Here
Here
Here

This little guy, Jibo, is a new robot still in development. We like him too.

Thursday, April 23, 2015

Printer Robot

Some of our friends gave Seb an old printer to take apart. The printer motor still worked, so he hooked it up to a battery and made this funny little spinning "robot." :) 

Wednesday, April 22, 2015

Passive-dynamic mini-walker robot

This little guy is a passive-dynamic robot walker we made (meaning that he works through gravity and balance alone, not by a battery or anything). He was not entirely successful but we liked him anyway. It was interesting to see how the little feet could be induced down a slope. Lots of simple robots use this principle.

We learned how to make this walker from this book (great book, by the way!), and you can download .pdf instructions here.

Here's another (better) video of one of these walking.

You can also see one here.

Our version:

Saturday, April 18, 2015

Lego Mindstorms

We deliberated for a long time before getting the Lego Mindstorms robots, because they are expensive! But we finally decided to use some school money to get this kit. Sam convinced me that the study of robotics is important enough in many future science-related careers that it would be a good investment for our children. And so far, we love it! Abe (age 12) has been learning HTML from a book he got for Christmas, and he also has learned Scratch with Boy Scouts, so the Lego programming language was really easy for him to pick up. But Seb (age 9), who didn't have a lot of prior experience, has been able to learn a lot about programming too. 

They have built the robots from the instruction manuals, but they especially love building their own robots and programming them. And Malachi (age 7) likes to watch and help the older boys program, and especially to use the remote control to move the robots around. They are really fun and I'm glad we bought them.
I particularly liked this cute little guy.

Friday, April 17, 2015

Space Robots and Rovers

Some of the most interesting robots we learned about were the Mars Rovers and other space robots. We watched this video from the library and found it fascinating.

We liked this book, too.

This page lets you experiment with controlling a robot vehicle remotely. When you try to control one on the moon, there's a delay, and it makes it really tricky!


Here are some awesome pictures taken by the Curiosity rover.


And we couldn't believe that Curiosity has even found evidence of brine on Mars!
The children made their own rovers out of Lego. They were quite complicated! :)
Junie made one too. :)

Tuesday, April 14, 2015

Assembly lines, industrial robots, and robotic arms

The most common kind of robot today, it turns out, is the robotic arm—the kind used in manufacturing. Unimate, the first robot, was made to work on an assembly line at General Motors. There are two main kinds of industrial robots: gantry robots (which move on an X, Y, Z axis, usually from an overhead frame) and SCARA robots which are fixed at the bottom and move with more degrees of freedom. You can see a comparison of the different types here, and also here and here.

We watched these two "How it's made" videos to see some robotic arms in action:
Really, almost any of the "How it's made" videos will show a robotic arm at work!

To illustrate the concept of assembly lines (each robot/machine/worker does one specific task and can therefore become maximally efficient at it), we decorated robot-face cookies with an assembly line. Each person put on one type of decoration and then moved the cookies down the line.
The children got pretty good at their jobs, if not quite as good as real robot workers :)
Next, we made Lego robots and had them make things on assembly lines. These little robot workers were so cute:
And so hard-working!
But Sebby's robotic arm (SCARA robot) was even more true-to-life.

Monday, April 13, 2015

How Binary Code works: a visual example

The older boys have done enough programming that they kind of understand the idea of binary code, and we also talked about it a bit with switches during our electricity unit. But I liked this activity (instructions here) for its very clear illustration of that binary on/off 1/0 dichotomy.

The idea is that you draw a picture, then superimpose it on graph paper. If the picture fills more than 50% of a given box in the grid, you put a "1" in that box. If it fills less than 50%, you put a "0."

Then you read off your grid numbers out loud, while the students recreate your drawing by filling in a box when you say "1" and leaving the box empty when you say "0."
A simple airplane picture looks like this in the grid.
It's a really obvious way to show how smaller pixels make a clearer picture, too. Above you can see the various iterations of a picture of a bunny. The original picture is on the left in pink. When you re-create it in binary with a large grid, you get the not-very-good blue bunny in the middle. But with a smaller grid (smaller pixels) you get the more-accurate grey bunny on the right.

Thursday, April 9, 2015

"Frubber" Robot Skin

We learned about "Frubber," a kind of lightweight polymer robot "skin." You can learn more about frubber here and here.

Then we made our own "robot skin," sometimes known as GAK or…silly putty! You make it from Borax and White Glue, and even though it's not exactly the same as David Hanson's "frubber," it is a polymer, and it's so fun to play with! Here are the instructions for making gak. So easy and fun.
Sebby made Wall-E and Eve
Scary robot-face!
It took some time and patience to get it stretch out far enough to become really supple, but then it made excellent "skin"!
If you were really patient, you could get it to be so thin, it was nearly transparent!
Abe-bot

Wednesday, April 8, 2015

Robot jaws and robot hands

We learned about the various components that make up a robot (we did this over several days because there was SO much to learn!). Things like: 
  • Types of motors: electric (servo, DC, geared, stepper), hydraulic, pneumatic
  • Muscle wire for push/pull motion
  • Power: Batteries, circuit boards
  • Actuators, effectors, controllers 
  • Sensors (input, output, photoresistor, UV, sonar, radar, lidar, infrared, etc.)
This "can a robot tie your shoes?" activity is a good way to demonstrate some of the limitations that robots have when trying to do everyday human tasks.

There were a couple other activities we particularly liked. The first one was building this "robot hand." It is constructed very simply out of cardboard, strings, and drinking straws. 

This is basically what we did, although these instructions make it seem rather complicated, and it really isn't. You can just look at the picture above to see how it all goes together: sections of straw on small squares of cardboard, with tape connecting them to the main hand. And then straws threaded through it all. It moves with surprising agility for such a simple thing! We loved it.

This version, slightly different, looks pretty cool too!

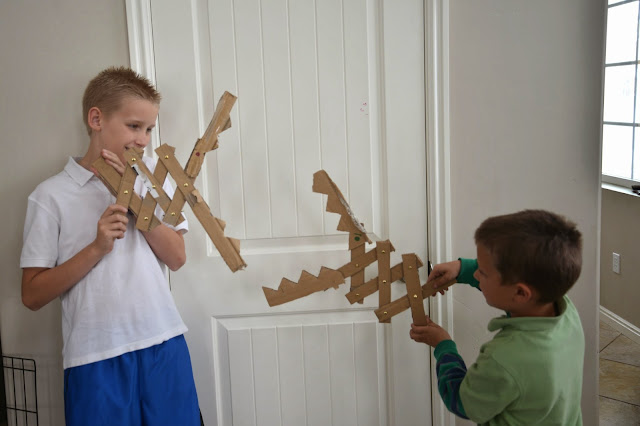
The other hugely successful activity was making these robots arms, or "robot jaws" as we called them. They are a pretty good example of a common type of effector used in robots. We found our instructions here (where they are called "monster jaws"). They are really easy and fun to make!
I think the coolest thing about these is how the criss-cross construction makes them able to extend and contract so drastically! They look short and tiny and then suddenly…HOMP!
They provided everyone with many hours of chomp-y entertainment :)
Related Posts Plugin for WordPress, Blogger...