Pages

Friday, September 30, 2016

Insect Collection and Display

I mentioned before how much I liked making an insect collection when I was in sixth grade, and I think I enjoyed it even more this time. The children did most of the actual hunting, but it was so exciting every time we found a new insect! There were a few other insects we would have liked to find: a katydid, a stick insect, a centipede (not an insect, but we still wanted one), and a bigger moth. But we really got most of the things we hoped to get, and we love the way our collection looks now!

We labeled our specimens the best we could using our Insect and Butterfly Guides, but we may have gotten some wrong—sometimes it's so hard to tell! But it was fun trying to figure out what we'd found, anyway. We decided not to include orders and classes and scientific names, for the sake of simplicity (we liked how the collection looked better without large labels).
We ordered several things from Home Science Tools which made collecting even simpler. Here are the supplies we got:

Basic insect collecting kit. The spreading board was really useful, as were the forceps, and the pins of course. And the killing jar worked great. I hate the killing part (I always feel so sad for the poor little insects!) so it is nice to know that it's quick and painless. You can order more of the ethyl acetate if you run out (we didn't get even close, though).

Nets. We got a kid one and a standard one and they both worked well. We liked the longer handle best.

Display box. First we just had this basic box, but it started to fill up and when our specimens were looking so great, we decided we might actually want to display them. So this nicer box is perfect!
We took the glass lid off of the box for the other pictures, to get rid of the reflection on it, but I think the collection looks even nicer under the glass. We like it so much that we're going to hang it up on the wall!

Wednesday, September 28, 2016

Insect Unit Celebration

At the end of our unit, I decided we ought to use a few of the MANY cute ideas I'd seen online, and have an insect-themed celebration. It always seems like a lot of work to do these things, but since it's for school and the children like it SO much, I usually manage to muster up the motivation.

For decorations, we made these cute pleated butterflies. We worked on them together while we were watching some insect video (I think it was this one) earlier in the day, and they went really fast and took relatively little effort. You don't even really need the template, once you get the hang of it. And they looked really cute fluttering around on the windows. It would have been cute to put them on some sort of garland, but the way they were weighted made that seem tricky.

I would have also liked to make these butterfly balloons my friend Tia made for her daughter's birthday—but somehow I never got around to it!

We had a Honeybee-themed dinner to go along with one of our units a couple years ago, and we honestly could have just made all the exact same foods this time and been happy! (I think this Honey Panna Cotta was our favorite.) We decided we wanted to try some new things anyway, but you can find some more bee-specific ideas at this Pinterest board.
Here's what we ate at our celebration.
The caterpillar skewers were just fruit on a skewer. I drew in the eyes and antennae to give the general idea, ha ha. You could obviously make this better by using frosting or chocolate chips or what have you to make actual faces, but my kids mostly just wanted to eat theirs.
Here's how to make the little Babybel cheese ladybugs. We used a paring knife to trim the red wax into the right shape, and then an edible-ink pen to draw on spots. We also did some spots by punching out holes with a tiny straw, which I thought looked quite cute:
And then we stuck in toothpicks for legs. Seb also made probosces on some of his. :)

We made an Italian pasta salad using butterfly noodles, and then to go with that, we made these little mini corndogs which I liked because they were such a good model for a moth or butterfly. The hotdog is like the caterpillar; then you cover it with batter which is like the cocoon. When you deep-fry it, it hardens (again like the chysalis or the cocoon). Then to serve it, you stick some triangular chips into the side and it becomes a butterfly! :) Cute!
I ended up burning myself pretty severely while Abe and I were deep frying these, which rendered my hand useless for the rest of the evening, but luckily most everything was made by then and the kids could do the rest. I've never made corndogs from scratch (? well, not the hot dog part of course!) before, but it isn't hard. Just a quick stir-together corn batter and then the deep frying (use caution! Grabbing the wrong end of the tongs was my downfall). There's a recipe here.
These pretzel butterflies were really fun to make, although they didn't turn out nearly as smooth and nice as the ones we copied! We just melted white chocolate wafers (with a few drops of food coloring to color it), stirred, and poured into a squeeze bottle, then squeezed the melted chocolate into the spaces of the pretzels. They hardened quickly and they were really yummy. Here is another similar idea using fruit roll-ups that we considered.
We have liked Italian Sodas ever since we discovered them several years ago, so it was a simple matter to call them nectar sodas and add them to the menu. :) I wish we still had those rose and lavender syrups we made back then!
Abe took a picture of the final spread (as my hand was otherwise occupied in a bag of ice at that time) and it did look quite nice! I had ordered these edible crickets from Amazon in three flavors, so we ate those too. Everyone quite liked them, even Teddy, who kept yelling "KIKKET! More KIKKET!" with great enthusiasm. They don't really taste like anything except just the flavoring that's on them, and you get a nice little light crispness as you crunch into them. Not bad at all. And after dinner we watched "Valley of the Lost Ants" (though it could just as well have been "A Bug's Life") and we all considered it quite a satisfactory ending to this Insect Unit!

Monday, September 26, 2016

Collecting Insects

We had so much fun collecting insects wherever we went during this unit! We took our nets and jar with us whenever we drove anywhere, and we took several field trips specifically to search for insects in different habitats. The beautiful Fall weather made this the perfect time to enjoy being outside and insect-hunting! We ended up letting lots of insects free after catching them, since we only really wanted one of most things for our collection. Sometimes the children made little "homes" for the insects in boxes and jars so they could observe them for a few days before letting them go. So fun.

You can see our finished (at least for now) insect collection in this post. There are also details on what collecting supplies we used.
By the creek—there were so many dragonflies and damselflies here! And they are FAST!
Millcreek Canyon
Silver Lake
North shore of the Great Salt Lake, near the Spiral Jetty. This was a really strange and interesting place because there was a whole line of dead insects, preserved in the salt flats around the lake. We found HUNDREDS of dead ladybugs, and lots of beetles and praying mantises and grasshoppers and other things too. It was really fascinating. We weren't sure why there were so many: maybe they were insects from all over the lake that had died while drinking the salt water, and then they all washed ashore here?
Millcreek Canyon, again
American Fork Canyon—getting a little schoolwork done as well! :)

Friday, September 23, 2016

Caterpillar to Butterfly Metamorphosis Craft

We really loved this craft, shown here (with more instructions in this video. I can't stop thinking about the cute way she calls them "paddle-pop"[? or pad-a-pop?] sticks. Adorable.). There are actually several really cute caterpillar and butterfly crafts on this page, but this one was my favorite because of the way it transforms from caterpillar to butterfly. And we used Sharpie, naturally, instead of painting, because whenever it is possible to make something easier and less messy, I try to do so. :)

We ran out of popsicle sticks after four kids, so for the younger two (who naturally couldn't BEAR to be left out of the craft-making), I improvised with an accordion-folded piece of paper. It worked fine and they were so happy to have their own little caterpillar/butterflies to play with! (Besides the real ones, of course!)
Goldie took it all very seriously.
These girls LOVED telling the story of their caterpillars' life cycles as they played with these.
Malachi's nice fat rainbow caterpillar.
Ky added his own twist by drawing a chysalis on the back of the popsicle sticks, so that you could fold the sides in and let the caterpillar metamorphose inside before changing into a butterfly. Everyone else liked that and copied it on their crafts too. (And Malachi was very pleased with himself for having the caterpillar leave that "Sorry, be in the next picture" sign on the "door" of his chysalis. Ha!)
And here is Malachi's butterfly. So cute!
Seb spent such a long time making his Monarch butterfly beautiful and accurate that he didn't want to spoil the effect by gluing fwuffballs down the thorax (much as he likes fwuffballs).
And here are all the caterpillars…
transformed to beautiful butterflies!

Wednesday, September 21, 2016

Butterfly Life Cycle Collage

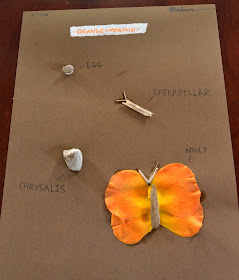
Inspired by these lovely insect collages, we went on a little nature walk and gathered materials, then made these Butterfly Life Cycle collages with what we found. As you can see they weren't ideal for laying flat and putting in binders, but they were still fun to make. :)

For more on the life cycles of insects, and photographs of the different stages, see this post. (And for another craft, see here.)
Junie really loved this project. She made several different pictures. Here are two of them.
Abe's "Orange Morpho."
Malachi's cute little egg, caterpillar, chrysalis, and butterfly.

Tuesday, September 20, 2016

Raising butterflies from a kit

As soon as I started planning this Insect Unit, I thought, "We have got to order one of those caterpillar metamorphosis kits again!" We had done it awhile ago and LOVED it. I asked the children if they remembered and was astounded to realize that it was NINE YEARS AGO! And only Abe really had memories of it!

It is a really fun thing to do. You order the caterpillars and they come in a little cup, and grow at an incredible rate. The cup has all the food they need, so all you do is watch them as they get huge, and then turn into chrysalises, and then emerge as beautiful Painted Lady butterflies!

Speaking of chrysalises (or chrysalids, as we learned is an alternate plural form…doesn't it seem like it ought to be "chysali"?)—maybe you have read Eric Carle's explanation of why HIS hungry caterpillar makes a cocoon instead of turning into a chrysalis? It's charming. And we were very interested to find out the difference between a cocoon and a chrysalis. A cocoon is like a little web that the caterpillar spins around itself, which then hardens to protect the changing caterpillar inside. And a chrysalis IS actually the caterpillar…changed into a different state (the pupa) and with a hardened outer skin. Most butterflies form a chrysalis and most moths spin cocoons. You can read more about that here, among other places.
Cute little caterpillars on successive days.
They attach themselves to the top of the cup with a little silk pad. You can see how at first they still look like caterpillars. Then they molt one last time, and suddenly…they are chrysalises!
Once they have hardened for a couple days, you can put them upright in this little holder. And what is strange…they seem like just husks, but they are still kind of…alive. And if they get bumped or startled they will start to wiggle and shake themselves around! It is the weirdest thing to see. We laughed and laughed! Here is a little video:
They were startled because one butterfly had emerged and bumped the other chysalises on his way out! :)
Three butterflies have emerged. You can see their empty chrysalises. Two to go!

When the butterflies were all out, we kept them in their little habitat for a few days, and then finally, reluctantly, let them go. We had grown to love them in that time. :) The children loved to put their hands into the habitat and let the butterflies land there and walk around with their tickly little feet. Sometimes a butterfly would put out its proboscis and taste someone's finger, to our great delight!
Before we let the butterflies go, though, we had caught a couple Monarch butterflies. We thought they were so beautiful we wanted to keep them and watch them for awhile, so we put them in the habitat with the Painted Ladies. We don't know how all the butterflies felt about that, but they didn't seem to bother each other too much, anyway. It was so fun to watch them flying around and sipping nectar! We finally forced ourselves to put one of the Monarchs in the killing jar for our collection (we were so sad! But we assured it that it would live on in our hearts forever!), and then we let the other one free with the Painted Ladies. But not before Junie did lots of collegial flitting about with her own Monarch wings!
Our butterflies flapped around us saying "thank you" and "goodbye" for awhile before flying away. We were sorry to see them go, but happy that they got to go out into the beautiful world at last!