Thursday, May 7, 2020

Make a comet, two ways

We talked about comets, meteors, and asteroids, and found two fun ways to model a comet. (We also considered making these edible asteroids, but didn't end up doing it.) 

The first comet uses dry ice, and we had done this before, but it is always fun to play with dry ice! We got the recipe here. These comets are basically made of the same things real comets are made of!

You need the following ingredients:
2 cups water
2 cups dry ice
2 tablespoons sand or dirt
A dash of ammonia
A dash of organic material (dark corn syrup works well)

You can find more instructions at that link, but basically you mix those things together and freeze them into a sort of ice ball. Then you can set it in the sun and watch the ice sublimate and form little trailing "tails." It's really cool!
You can see the gases trailing off our "comet" in this video.

I think the children had even more fun, though, with this second comet-making activity, which is basically homemade ice cream in a bag! We used to do this at Girls' Camp when I was young, but my kids have never done it before and they were AMAZED when they opened up their ziploc bags and there was ice cream inside!

The instructions are here (the second recipe on the page) along with an explanation of why this is a valid model of a comet. :)
I love Teddy's face as he bites into his ice cream.
And Daisy's wide eyes! :) Such a fun activity.

Monday, May 4, 2020

Radar Mapping on Venus activity

This is an activity I'm still rather proud of because I thought of it myself. :) You can see it in its previous iteration here. The idea is to learn about how radar can help astronomers map the terrain of a planet like Venus, where they can't actually see and photograph the surface.

The activity proceeds as follows: First you get a box of some kind and fill it with things to represent mountains, valleys, plains, holes, etc. You want a variety of heights to mimic a varied terrain. Then cover the box with paper so no one can see what's inside. This is like the cloud cover on Venus

Next, take a long wooden skewer and color the bottom end of it a different color every centimeter or so. (I believe last time we used actual cm measurements, but this was a little tricky to figure out—the colors worked better for younger children.) This skewer is like your "radar" which bounces off of objects beneath the "clouds."
Have the children take turns poking the skewer into the paper. For each poke, note the color the skewer goes down to. Whichever children aren't poking can make a map of these colors. If the skewer can only poke down to red, make a red dot in that spot. If it pokes all the way down to blue, make a blue dot. And so on.

The more pokes you make (or the more radar measurements you record), the more accurate the picture of your terrain will be!
Once you've made measurement dots over the majority of your paper, you can translate that into pictoral data and get a topographical picture of your surface. You can see how we did this: on the paper above, we have a big area of turquoise dots in the left corner, a long area of pink dots along the right side, and so forth. Once those areas were filled in with color, the result was the paper below. You can read this map by remembering that the colors move from warm (high) to cool (low)—dark blue is a low valley; light pink is a high mountain.
We tore off the paper over the box to see how accurate our map was compared to the actual terrain. Pretty good! We accurately mapped the valley on the left side, the long parallel mountain ranges, the deep sinkhole, and even the long sloping hill (the slide).
The children had so much fun doing this that they wanted to keep doing it on their own. They loved hiding objects under the paper and then poking through to see what they could discern about them!

When we talked about Venus, we also discussed how clouds form, and how air pressure relates to cloud formation. 

We followed the instructions for this "cloud in a jar" activity here. This little demonstration shows how as you push down on the balloon (increasing the air pressure in the jar) and then release that pressure, a "cloud" instantly forms in the jar.

Thursday, April 30, 2020

Modeling the size and scale of the solar system

There are so many ways to do this, and a million ideas online. I'll just link a few resources we used.

This is a calculator where you can enter in the size you want your sun (or some other planet) to be, and get the scaled sizes of the other solar system objects that are proportionate to it.

This is a video about some students who made an outdoor scale model of the Solar System

This is a really simple printout of the planets all to scale with each other.

Here are some of the ways we modeled the Solar System last time we did this unit.

This time, we took a Solar System walk and were amazed all over again at how close the rocky planets are to each other… and how FAR away the rest of the planets are!
Standing at the "sun"
Children standing on the "rocky planets"…with a tiny Malachi almost out of view on "Jupiter," and Saturn, Uranus, and Nepture too far away to see!
We also really had fun putting up a paper solar system on the wall…scaled for size, but not for distance, of course. Last time we did this, we made Jupiter the biggest object and didn't even try to include the sun. This time, we made the sun as big as we could (on butcher paper) and then even Jupiter was relatively tiny next to it. We had to get up on a ladder to find a spot to put our huge sun! It was great to have it watching over us all during this unit. :)

Friday, April 24, 2020

Solar System Unit, Version II

click to enlarge
After the coronavirus shutdowns began this spring, and everything was closed, I had to think of a unit we could do without the benefit of the library! I rely heavily on our inter-library loan system for books, so it was hard to do without it. But as I looked through the books in our personal library, I realized that a unit on our Solar System would be perfect. We already owned many books we could use, and we'd done this unit before so I had lots of ideas for activities. I was surprised, as always, though, at how long it had been since we last studied the Solar System—seven years ago in 2013! Marigold hadn't even been born yet (I think I was expecting her at the time!).

One of my favorite things about teaching the children at home is watching them get excited about the subjects we're studying. Malachi has always been the one who loves Space (and really, how can anyone NOT love Space?) but during this unit, Teddy's interest really caught fire and he started poring over our Solar System books and playing Astronaut and Mars Rover all the time, just like Malachi used to. It was so fun to see!

To go along with this unit, we used a great series of videos from YouTube called "Crash Course Astronomy." (They have some specially "for kids" as well—but we liked the regular ones better.) They cover tons of information, but most of it is explained quite simply, and it's split into a bunch of different videos so you can take them one step at at time. I had organized this unit with basically a day on each planet, plus separate days for the sun, the moon, comets, asteroids, and so forth—so these videos correlated perfectly. We started with this one—Crash Course: Mercury—and went from there. You can see a whole list of videos here, or just search for the specific planet you want on YouTube.

Our second favorite group of videos were these called "Solar System 101" by National Geographic. That link takes you to a playlist with all the planets, plus some extras like meteor showers and exoplanets.

We tried out a few other video series, but most of them were annoying and/or had music that was too loud. You'd be surprised (or maybe you wouldn't) at how many "Kids' Videos" have that problem.

I will also highlight one of our favorite solar system books (and we have read many, many solar system books)—it's a newer one and the photos are spectacular. You can find Teddy looking at this book almost every day around here! It's called "The Planets: The Definitive Visual Guide to Our Solar System."

We tried watching some of these NOVA shows about the planets, and the imagery is really beautiful, but the narration and pacing annoyed us, so we didn't end up watching them all.
One of the first activities we did was make these rotation/revolution models (instructions here) to show the difference between those two terms. I thought it was fun to look back at the previous crop of students who made these last time I taught this unit! Little Sebby and little Abey!

Tuesday, March 31, 2020

The 1800's and the Restoration of the Gospel Homeschool Unit

click to enlarge
In October 2019, the President of our Church, Russell M. Nelson, announced that 2020 would be a year to celebrate the Restoration of the Church of Jesus Christ on the earth, which commenced with Joseph Smith's vision 200 years ago in 1820. He asked every member and family to
prepare for a unique conference that will commemorate the very foundations of the restored gospel. 
You may wish to begin your preparation by reading afresh Joseph Smith’s account of the First Vision as recorded in the Pearl of Great Price. Our course of study for next year in Come, Follow Me is the Book of Mormon. You may wish to ponder important questions such as, “How would my life be different if my knowledge gained from the Book of Mormon were suddenly taken away?” or “How have the events that followed the First Vision made a difference for me and my loved ones?” Also, with the Book of Mormon videos now becoming available, you may wish to incorporate them in your individual and family study. 
Select your own questions. Design your own plan. Immerse yourself in the glorious light of the Restoration. As you do, general conference next April will be not only memorable; it will be unforgettable.
I spent a few months worrying about how on earth we were going to "immerse ourselves in the glorious light of the restoration." I knew I could study the priesthood and Joseph Smith History on my own, but how to get the family involved too? After talking to Sam about it, I finally decided we'd take some time in Spring of 2020 to do a Homeschool Unit on the 1800's in general, and the events of the Restoration in particular. Sam said he was always much more able to understand and appreciate church events when he had a good picture of what else was going on in the world at the same time, so I thought that would be a good place to start.

I also realized that we'd studied the American Revolution, and we'd studied the Civil War, but we'd never really studied the time period in between the two, so this unit would be a good chance to fill that gap.

Some of the main historical events and issues we talked about from the 1800's:

• Colonialism
• the French and Indian War/Seven Years' War
• the War of 1812
• the Napoleonic Wars
• the Louisiana Purchase
• the Lewis and Clark Expedition
• the Gold Rush
• the Erie Canal
• the Missouri Compromise
• the French Revolution
• the Napoleonic Code

We also discussed contemporary figures:
• Napoleon Bonaparte
• Charles Dickens
• Ludwig van Beethoven, and the Classical and Romantic Eras in music
• Abraham Lincoln
• Louisa May Alcott
• Ralph Waldo Emerson

One thing I hadn't realized was how closely contemporary, and really quite similar in many ways, Joseph Smith and Abraham Lincoln were. They may even have met once! I read these two books and thought they were both great:
I shared parts of them with the children, and I wanted my older boys to read especially the Timothy Ballard one, but they didn't ever get around to it. Too bad.

I had planned this unit to take place in the six weeks or so leading up to General Conference, and so as things turned out it also corresponded with the cancelling of everything due to the Coronavirus Pandemic. Luckily, we already had our library books, and though I had a few field trips planned up to Temple Square to watch the Joseph Smith movie and do some other things, we were able to figure out substitute activities at home. And luckily, all the church movies are also online. There are worse ways to spend quarantine than studying the early days of the Restoration! I found it calming and comforting to have that be our focus, and I was really grateful to feel that we had truly prepared ourselves to experience the historic April 2020 Conference!

Here are some links to resources we watched or studied:

https://www.youtube.com/watch?v=oP_EMknPE10

I found so many great ideas and links (many of these above) at my friend Montserrat's blog, A Gospel Centered Home. She has simple Family Home Evening lesson ideas and tons of activities for kids. 

Here's my (fairly scant) Pinterest Board for this unit.
\
Making Butter.
 Silhouettes are a fun 19th-century art project; you can find instructions here. Junie did one too but I guess I don't have a picture!
Pioneer Handkerchief Dolls we made

Monday, February 3, 2020

Inventors and Inventions Unit

click to enlarge
Coming back from a new baby, I wanted to teach a unit that didn't need a ton of preparation. This one was perfect. We read a bunch of books about cool and funny inventions, talked about the technologies involved, played with some of the inventions we read about (like Slinkies and Super Soakers), and then I let the children do a lot of designing and iterating on their own inventions throughout the unit.

This is a really good resource for hands-on activities that help teach kids good design principles. I think they must be from a TV Show? It's called "Design Squad."

If you click on the link at the top left of that page, where it says "Videos," there are some fun videos showing the design process as well. Our favorites were the ones, like this one, where a dad engineers toys out of cardboard for his toddler son.
My brother is a patent attorney, and I would have loved to have him come as a Guest Speaker for our unit, but he lives in California. So we did the next best thing—a Skype call while he talked us through a PowerPoint presentation he'd made and sent ahead of time. It was so interesting! He's so good at explaining things and making complicated concepts seem simple. My older boys, especially, were fascinated and kept asking questions. He taught us about intellectual property and all its sub-categories—patents, copyrights, trademarks, and so forth.

Pictured above, we are on the call with him—a pretty typical picture of our homeschool with half the children in pajamas, me nursing a baby, people climbing all over each other, etc.

These are some "musical instruments" the children invented/built one day:

Monday, November 4, 2019

Human Body Unit

click to enlarge
We have covered major body systems in our school before: the cardiovascular system, the nervous system, a genetics unit, and a few different units on babies. I thought it would be fun this time to talk about some of the amazing things people can do using all the different parts of their bodies. So, I called this unit "The Amazing Human Body." This was also a good lead-up to the birth of baby #9 in our family, as we ended with a review of babies and human reproduction!
It was kind of fun to have our section on "Bones" correspond with the week of Halloween—we made this cool life-sized skeleton out of milk cartons, and it made a perfect Halloween decoration for our porch! :)
Our milk-carton skeleton was a friend for this skeleton we already had!

More Bones activities: 

life-size skeleton print-out (we printed several of these and the children colored them)
A video about the skeletal system

A diagram of major bones, for labeling
A little online skeletal system game

For muscles

we learned how muscles worked and made models of extensors and flexors.
We learned about some famous martial artists.
We watched some amazing gymnastic routines (here are some examples),
The kids LOVED seeing some of Damien Walters' work—he is a stuntman who does amazing tricks!
And we watched some Buster Keaton movies to learn about physical comedy in movies.

For the heart and lungs,

We talked about deep-sea divers and this amazing man, Stig Severinsen
We learned about several Olympic athletes such as Michael Phelps, Usain Bolt, Eliud Kipchoge, and Rowan Hooper, an ultramarathon runner. 
We learned about anaerobic vs. aerobic respiration, oxygen exchange, and altitude sickness.

For sight and hearing,

We learned about blind people who "see" using sonar or clicking sounds (see also here)
We watched a video about this archer with incredible eyesight (and reflexes!)
We learned about Stephen Wiltshire, a man with Savant Syndrome, who can remember and draw whole city skylines
And Derek Paravinci, who has an incredible ability for playing music by ear
We also watched some videos about samurais, marksmen, and archers, all of whom have developed their eyesight and reflexes in pursuit of excellence in their sports.

For memory, 

We learned more about short-term memory, long-term memory, mnemonics, and Savant Syndrome.
We watched a movie about Kim Peek, about whom the movie "Rain Man" was made. I haven't seen Rain Man, but we loved learning about Kim. We learned that he was a member of our church, The Church of Jesus Christ of Latter-day Saints, and he loved the Book of Mormon!
We also learned about Daniel Tammet, who has a prodigious memory.

We also learned about Babies--

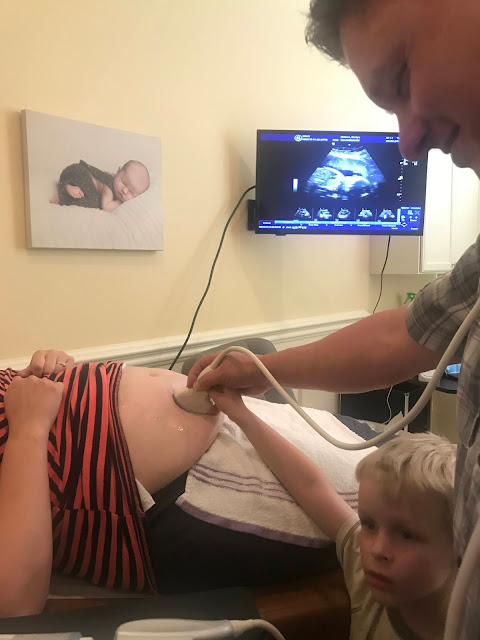
We did some activities we've enjoyed before (like swaddling, learning to change diapers, etc.), we read some of our favorite books, and the children even got to help do an ultrasound on me in preparation for the new baby!

Monday, October 21, 2019

Dugway Geode Beds Field Trip

(Cross-posted from our family blog)
We seem to end up studying geology every few years in our homeschool—it's just one of those subjects we like too much to leave alone for long. We've been on field trips all over Utah collecting rocks, but we've never been to the Dugway Geode Beds before. It's probably because I got scared off by reading how to get there. You have to drive on a dirt road for over an hour, and then you need a "high-clearance vehicle" for the beds themselves. After getting stuck in our minivan out in the middle of the desert west of Delta several years ago, I didn't want to risk that ever happening again! So I always basically dismissed the geode beds as an option, even though they sounded like a cool place to go.

But…now we have an enormous van instead of a minivan. And I found a day that Sam could go with us. So I thought we might attempt it!

It turned out to be a beautiful day, and the dirt road was really quite well-maintained and not hard at all to drive on. (Well…Sam was actually the one driving. But I don't think it stressed him out too much either!) And it was pretty! Really pretty wild desert scenery, if you like that sort of thing—and I do. I had read there is even a herd of wild horses out there, and I was hoping we'd get to see them! And, on the way home, we did! A whole bunch of them were grazing not too far from the highway. That was fun to see. 

The road gets a lot worse once you turn off at the "Geode Beds" sign (or "Grode Bed Road," as our GPS called it), but it was nothing our van and the intrepid Sam couldn't handle. I think any regular car would have been totally fine up to that point, but if you were coming here in a non-high-clearance vehicle I think it would be smart just to leave it at the entrance and hike in. (Which might be a little bit of a pain, because you have to go quite a long way in, and then you'd be carrying your buckets of rocks back out with you, but there were a lot of holes and dips in the road that made me nervous even in the van!) It was fine for us, though, and there are several branching and intersecting roads, so maybe you could find a gentler route if you searched a bit.
I had found a map with someone's suggested coordinates of a good spot to start hunting, so we drove into that area and unloaded our stuff: shovels, rock hammers, a pick, gloves, goggles, and buckets. Right when we got out of the car we saw lots of sparkly broken geodes everywhere—rocks other people had broken open and left there, I suppose. They were so pretty, and the little ones would have been totally happy just picking up those the whole time!
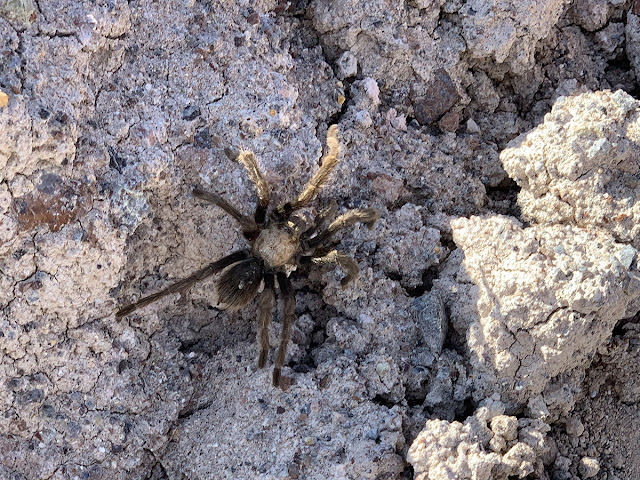
Right away, Abe saw a tarantula and called us all over to see. (I like spiders, as do we all. Ziggy likes them A LOT and has even made up his own version of what they "say": "Poh, poh, poh.")(Because what good is an animal if you can't make the noise it makes?)(Though I have no idea where he got "poh, poh, poh.") This was such a big tarantula and it was cool to see it just crawling around in the wild here!
The digging was tricky and a little frustrating at first, because we didn't know exactly what we were looking for, or where we should be looking. You're supposed to dig down a bit to find the layer where most of the geodes are, but there are also some big pits where excavators have dug down quite deep, so you can climb into those and find good spots in the walls of the pits. Somewhere I'd read that you should look for pinkish and yellowish clay, with kind of a cookie-dough-like texture. We did find some pockets of that, and we did find some roundish rocks, but mostly the best stuff we were finding was still in fragments. The soil isn't TOO hard, but it still takes effort to dig down very far. And of course Sam and I were constantly trying to keep Ziggy from falling into holes, and mediating disputes about who got to use the rock hammers. So we didn't feel we were really maximizing our finding potential.
Still, with some effort, we started digging up rocks we were pretty sure were geodes. They were round and relatively light, and when we started breaking them open they had beautiful crystals inside! So that was exciting. I was yelled for urgently to "come see this, Mommy!" approximately 500 million times.
We were thinking we'd save some geodes intact, so we could take them home and get them cut open neatly at a rock shop, but the kids had a really hard time not wanting to just smash them open right then so they could see what was inside! So, they mostly just smashed away. And it WAS amazing to see how different each one was; each a tiny treasure box holding something new inside. There were all kinds of colors and textures and crystals. All beautiful.
Related Posts Plugin for WordPress, Blogger...