Showing posts with label igneous rocks. Show all posts

Monday, September 16, 2019

Crystal-Growing Activities


For years now I've been wanting to repeat this activity because it's just SO COOL. But I've also been nervous because it's a little tricky to get right. Sometimes it doesn't work and then you have to patiently boil down the solution and try again. We did need to do that a couple of times, but it was so worth it! 
A couple weird stages our hot ice went through when we overheated it or crystallized it accidentally. It's okay. You can always melt it down, add a little more vinegar, and try again.

Unfortunately, the video tutorial for making hot ice which we watched last time was no longer online, but I kind of remembered what to do, and we watched this video to refresh our memories on the details. I also explain the process in my earlier blog post about it.

Crystals are a great lead-in to talking about the relationship between temperature and pressure (you can also talk about this with respect to geysers). This video is cool, about how a pressure cooker or Instant Pot works. The same principle applies deep inside the earth, and allows water to become superheated or supersaturated with mineral solvents.

Another activity I've always wanted to do is growing a crystal from a seed crystal. It is pretty easy. First, you just grow some small alum crystals, and then pick one of them and suspend it in the supersaturated alum solution. It is all outlined in this tutorial
Here are the small alum crystals. They're so pretty--like ice that doesn't melt, or like little diamonds. My children loved playing with them.
We picked out a nice biggish one to serve as our seed crystal. Then we suspended it with fishing line in the alum solution, like this:

We watched it for several days, and it grew a little each day. It was really cool! When we finally took it out of the solution, it was so big and beautiful! Here it is:
We loved the flat faces it developed—like a diamond!
We learned about how crystals grow bigger when left to grow slowly and undisturbed (intrusive vs extrusive mineral growth). Here's an example: we grew salt crystals on two pieces of cardboard (you just soak the cardboard in a supersaturated salt water solution). (See also here.) One was left outside to dry/crystallize in the sun and wind, and one was protected inside a warm oven. You can see the one that grew slower (on the right in this picture) had much bigger crystals! This is like what happens with basalt vs. granite.
Close up of those salt crystals on the right—I love how nicely cubic they are!
And here are some under a microscope. Beautiful!

Looking at crystals under a microscope is such an interesting thing to do. They become even more beautiful when you put a polarizing filter over your eyepiece so you can see the colors (birefringence). You can learn more about this and find instructions here.
These are citric acid crystals
Epsom salt crystals
And sugar crystals.
Epsom salt crystals, not under the microscope. You can learn how to grow these here or here. They grow really fast!
Another example of "intrusive" and "extrusive" crystal growth, this time with sugar. Instructions for this experiment are here, and you can learn more about the process in geology here
Here is the hot sugar solution while it's still cooling—you can see the surface has cooled more quickly than what's underneath, forming these cool surface wrinkles. Sometimes pahoehoe lava has wrinkles like this too!
And here we have the smoother, small extrusive crystals on the left, and the bigger intrusive ones on the right.
You can also make melted sugar that cools so quickly, it doesn't have time to form crystals at all! This is similar to obsidian. You can learn how to do that here. It is so pretty! And the children love to break off pieces and eat it. :)
Crystals are so cool. Find more crystal-growing activities here!

Monday, May 16, 2016

Igneous Rock

We have done a lot with rocks and the rock cycle before, so we didn't go all-out with it this time. There are tons of fun activities to do, though—igneous fudge, the chocolate rock cycle, and geologic brownie sundaes, to name a few. :) This one is similar to the "igneous sugar" activity we've done before, and demonstrates how crystal formation is aided by greater periods of time and warmer temperatures.

Sugar that cools very quickly forms very small crystals, or no crystals at all. To demonstrate, you melt sugar with a little water in a pan until it is just golden brown. Then pour the molten sugar in a very thin layer onto a pan you've had in the freezer. The sugar will cool almost immediately into this smooth, glassy substance, similar to the way obsidian or volcanic glass forms.
It's really quite beautiful.
On the other hand, if you make a supersaturated sugar solution that will cool very slowly (put it in a tall jar or glass, with a lid if possible), the crystals will have time to grow in a much larger and more definite form.
Like this. Ours took days and days to cool, so be patient! :)

This was a demonstration of how different types of magma flow at different speeds. The viscosity of magma affects what types of volcanoes will form in a particular location. We talked about this more during our volcano unit.

Saturday, October 26, 2013

Collecting Obsidian (Apache Tears) near Topaz Mountain

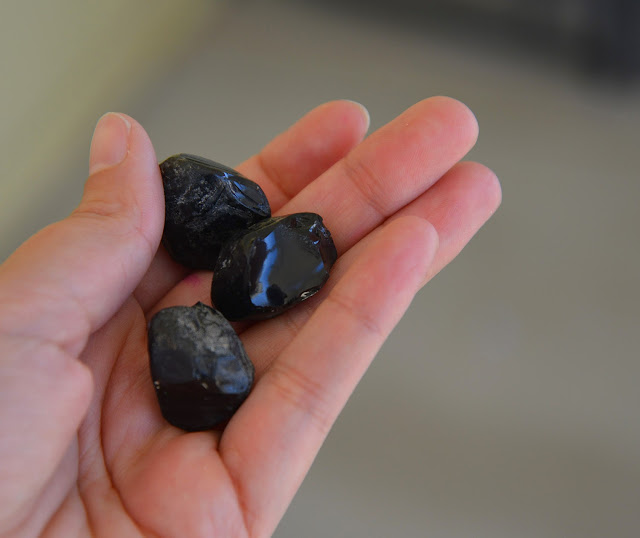
If you're going to look for topaz at Topaz Mountain, it's totally worth going a few miles farther to find obsidian at this site. Awesome JDan, whoever he is, has directions here---you basically just drive 7 miles past the turnoff to Topaz Mountain. Supposedly there is lots of obsidian in the Black Rock Desert, but when we visited Pahvant Butte Volcano we didn't see any, so this was very exciting. Especially these "Apache Tears," which have been stream-polished and are therefore quite shiny and rounded and beautiful.
Such beautiful views! There is truly nothing for miles around. Another reason I was glad to have Sam along for this trip!
It was even windier here than at the topaz site---probably because we were exposed up on the top of the hills. We thought we might blow away!

Once you start looking, you can find the little Apache Tears everywhere!

They are all over the ground on this hill.

Here are some of the obsidian pieces. They are so pretty and shiny! We are polishing some in our rock tumbler right now and I will update this with how they turn out. (UPDATE: the post is here.) But even just stream-polished, they are lovely and we had such fun collecting them!

Wednesday, October 9, 2013

Chocolate Rock Cycle

Now, to put all this information together in the Rock Cycle! There are lots of ideas online about how to simulate the rock cycle. You can use crayon shavings, but we used three types of baking chips---chocolate chips, peanut butter chips, and white chocolate chips.
You can start the cycle at any point. We started by "weathering" various rocks and minerals (the baking chips) into smaller sediment. We used graters, paring knives, and a microplane grater to do the weathering. You want some very small pieces, and some larger pieces, of each type of baking chip.
Sprinkle a little bit of each type of sediment onto a piece of foil. Wrap it up tight and then add some pressure. You can squeeze it tightly between your hands (this adds a bit of heat) and then stand on it. Put a book on top to distribute your weight evenly.
Unwrap the foil to see your sedimentary rock! Each person's "rock" will be a bit different, based on the rocks and minerals that it is composed of. Be careful when handling these rocks because they are quite fragile.
Now add more heat and pressure to make a metamorphic rock. We re-wrapped our rocks tightly in the foil and then floated them on some hot water for 10 seconds or so. (You don't want to melt the chocolate completely.) Press the foil between your hands again to add more pressure. Then put the rock (in its foil packet) into the refrigerator to harden for several eons (10 minutes or so). :)  Unwrap it to see your metamorphic rock! You can observe, at this point, that some of the "minerals" making up the rock are more melted and disfigured than others. This is true to nature, as different minerals have different melting points and will also re-crystallize at different temperatures.

Igneous rocks are next. Take your metamorphic rock, re-wrap it in foil, and float it for a longer time on some hot (even boiling) water.
Sometimes a little bit of water leaked into our foil "boats." It's okay.
Unwrap, take a toothpick, and stir the melted rock and minerals around. This is "magma," and you are creating convection currents in it.
Refrigerate the rock again until it's hard. Now you have an igneous rock! The minerals are still present, but you can no longer see them as individual components because they all melted together in the magma.

We LOVED this activity. It is simple and yet it models the process so well!
Sebastian's illustration of the rock cycle

Monday, September 30, 2013

Igneous Rocks

On our Igneous Rocks day, we did this igneous fudge activity. It was fun to make fudge, and it tasted good, but we found it really hard to tell the difference between the "intrusive" and the "extrusive" kinds. You could kind of detect a larger crystal size in the pan that cooled in the refrigerator, but it wasn't obvious. If I were doing it again, I would have instead re-done this igneous sugar activity that we did during our volcano unit. The results are much more stunning!  Of course, I think I also need a new candy thermometer (mine is about 30 degrees off, as far as I can tell, which doesn't make fudge-making easy).

We examined the igneous rocks from our rock collection.

We enjoyed this video on how granite is made into countertops.

We are lucky to have easily accessible examples of all three kinds of rocks in our nearby canyons, so using this guide, we spent a day driving around and looking at these examples. The igneous rock we saw was Quartz Monzonite in Little Cottonwood Canyon, which we have always known as "temple granite." Apparently, though it looks a lot like granite and the pioneers who built the Salt Lake Temple called it granite, it is not a TRUE granite. That's because true granite has over 20% quartz, while this rock at the Temple Quarry only contains about 5-20% quartz.


Little Cottonwood Canyon is a great example of a U-shaped valley, which means it was formed by a glacier.
There's an interesting little nature trail by the quarry, with signs that tell about some of the history of the area. Very beautiful.
Such a lovely Fall day!
Down in this rocky bed, it's fun to climb around and see the huge boulders of quartz monzonite!
As you can see, it has a lovely white-and-black-speckled appearance. It does look like granite. I don't know if you could tell them apart by just looking. You can tell it's an intrusive igneous rock, though,  because the mineral crystals are so large. The polished sheets of this rock that are on the outside of the Temple and the Conference Center are so pretty---the crystals gleam in the sun!

Basically this entire mountain is made up of quartz monzonite! It must have been a huge intrusion of magma which then was exposed through weathering and erosion.
Related Posts Plugin for WordPress, Blogger...