Friday, May 22, 2020

Solar System Celebration

It felt like the end of this school year deserved a good celebration! But I also didn't want to do anything that took too much preparation…prep time being rather a scarce resource around here. So we didn't do anything very fancy. Still, we had a fun time!

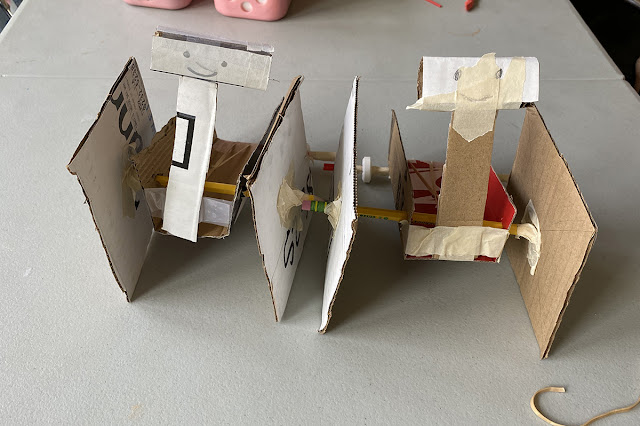
One activity we did was building Robot Arms like the one on the International Space Station. (Shown in this video, for example.) The children did this in teams, and there were moments of frustration…but they worked through them.
The parameters we used for this activity are found here (these Design Squad activities are always fun). The goal was to build a robot arm that could lift up a paper cup.
They did it!
The children enjoyed paper marbling so much during our Marbled Jupiter activity that they really wanted to do it again. This time we had three different color schemes to make Jupiter, Saturn, and Earth. (Instructions are here.)
It was definitely a more committed craft project than I'd attempt on a regular day—but this was a celebration day, so…I guess it was worth it. :)
When I found this "Build a cardboard rover" activity I knew we had to try it for the sake of our Rover-loving Teddy. I don't know what it was, but when we learned about the Mars Rovers, he just fell in love. He plays that he is a Rover, and he says he wants to go to Mars and take care of the Rovers when he grows up. He especially loves Curiosity, and still asks me almost daily if Curiosity is still working and going around up on Mars! (So far, the answer is yes!) We are pretty excited to watch the launch of the new Mars Rover in July.

The instructions for this "cardboard rover" are here. (Basically, it's just a rubber-band-powered car, with square "all-terrain" wheels.) It's really simple to make…though somehow walking several children through a project manages to be quite an involved process no matter how simple it is…sigh. Once we had our Rovers assembled they really liked iterating on ways to make them go faster or longer. Hard surfaces worked best!
Daisy made the cutest little mini robot arm to go on her Rover. It was jointed and moved just like our big robot arms!
Here's the robot arm in action!
We made these simple paper rockets, found here at Rising Wonder.
I had the bigger kids help me make these little "jet-packs," just for fun, for the little boys. (We didn't have enough 2-liter bottles for everyone, and we knew the little boys would have the most fun playing with them.) I don't even know where the original idea came from; these were everywhere when I searched "space party ideas." I didn't find written instructions but just looked at a picture and figured it out. Basically, you spray paint two two-liter bottles silver, duct tape them together, glue on some felt "flames," and attach straps like a backpack. Easy. The girls really loved helping spray paint and glue, and then presenting the "surprise" to Ziggy and Teddy with great fanfare!
I found a 9-pack of these planet necklaces for $12 on Amazon, so I ordered them and let the children divide them among themselves. They are really pretty!
I also thought it would be a really fun activity to make planet bracelets like this one. I ended up just ordering a couple because I didn't want to go to the craft store for beads during quarantine. But I still think it would be great to make your own—search for beads to represent each planet, and then string them together on bracelet elastic. Part of the fun is that it just looks like a cute bead bracelet—but YOU would know that it represents our Solar System. Fun!
Picture of the Solar System Goldie drew (I wish you could see all the little details)
 
Teddy's meticulous solar system. Note Jupiter's Great Red Spot, Saturn's hexagonal storm, and the tiny Mars Rovers (Curiosity and Opportunity) on Mars!
These various activities took us ALL DAY and were actually a lot more work than I was anticipating, interspersed with nursing Gussie and trying to keep the house from falling apart! But on the upside, it did really feel like a Day Of Fun! 

After we got all the activities cleaned up, we ended by making mini pizzas for dinner—Jupiter pizzas, of course!
It was actually pretty hard to keep a Jupiter-ish striped-cloud look after the pizza was cooked. Our nice lines of cheese all melted together! Luckily…they tasted great anyway. :)
And I had ordered this astronaut ice cream for dessert!

Monday, May 18, 2020

Marbled Paper Jupiters

While looking for activity ideas, I ran across this post about Marbled Jupiters and was intrigued by the idea. We've done paper marbling before and I've always wanted to revisit it, since it didn't work perfectly last time (but was still fun!). This is also just the sort of thing that I only manage to gear up for if I have to, for a school unit! I am not normally a person who loves to do crafts with children, but when I make the effort, the kids always have so much fun!

The "marbled Jupiters" post has some instructions about paper marbling, but I thought it was explained even better here. In case that link ever breaks, here are the basic instructions:

1. Pour 2 cups of liquid starch (you get it in a large bottle by the laundry products in any grocery store--it looks like this) in a wide pan, then add 1/2 tsp alum, stirring until mixed. The alum helps the paint stick to your paper, and I think this is a key ingredient we were missing last time we tried marbling paper! The paint clung to our paper (we used cardstock, but I've also read that watercolor paper works well) much better this time!

2. Take several colors of acrylic paint and put several drops each into bowls or paper cups, one color per bowl. Mix a little water into each color of paint to thin it and make it easier to drop.

3. With an eye-dropper or just with a spoon, drop several drops of the paint onto the top of the liquid starch/alum solution.
4. Gently swirl and marble the paint with a skewer or a plastic knife. (At this point, since we were making Jupiters, we also tried to make some storm-like features, and even a Great Red Spot.)

5. Lay a sheet of paper gently on top of the starch/paint bath, pressing down firmly. You can submerge the paper slightly.

6. Rinse the paper in a clear water bath. (The paint won't wash off—amazingly! Because of the alum, I think.)

7. Lay the paper on a flat surface to dry, but be careful—the starch will make it sticky and once it dries it may stick to your surface! Maybe we'll try using wax paper as a drying surface next time.
This was a really fun projects and we LOVED our finished Jupiters! We hung them up on our bulletin board for display.

Monday, May 11, 2020

Fun Moon Activities

We've done so many Moon-related activities over the years, I feel like everyone must be quite tired of them—but I guess each one is for a new crop of children! And even the older ones came drifting over when we were doing these activities for Elementary School, saying, "Oh yes…making craters…I love this!"—and before we knew it they were launching chocolate chips into our pudding as well! :)

There are a couple different ways to model craters. One is in pudding, as shown also here. And one is with flour and baking cocoa, which is probably a more accurate way to see phenomena like ejecta patterns and double cratering.
For this model, you just sift a layer of flour into a cake pan, and cover it with a layer of baking cocoa. This allows you to see what happens when the bottom material is disturbed by an impactor, and how the material can be thrown up onto the surface. You can read better instructions here.
Another fun activity—Moon Phase cookies. We originally saw this idea for making moon phases in Oreos, but since we like homemade Oreos much better than real ones, we always make our own. The recipe is at this link (it's really easy!). The only downside is that when the children spread the frosting themselves, it's not quite as neat as when they just carve phases into the pre-made circle of Oreo frosting! But it's fine. They like eating them, anyway. :)
Anyway, everyone had a very good grasp of moon phases, by the end. We filled out these moon charts by looking at the moon every night for a month, and they really had fun with that too.
Playing "moon tennis" with balloons and paper plate paddles—this is an activity we did last time we had this unit that was fun to repeat. I don't know if it really teaches that much about the moon, except that batting a balloon around feels weird, and playing with a ball on the moon probably would feel lighter. Well, anyway, we had fun.
But the MOST fun "moon" activity we did was renting this Bouncy House! Of course this is even more of a stretch, I suppose, learning-wise—but how better to celebrate the moon than bouncing around pretend you're walking on it? We stumbled onto a half-price bounce house rental deal and couldn't pass it up! We've never done anything like this before, so it was VERY exciting and even the older children had a great time!

Ziggy took awhile to warm up to the idea (it was big, and kind of loud because of the fan) but he was definitely fascinated and had LOTS to say and remember about the "bouncy slide" after we returned the rental the next day!
Even Baby Gus got to slide down!
And a bonus picture of the lovely crescent moon, with Venus shining brightly across the temple spire from it. We looked at Venus with the binoculars and were even able to see its phases!

Related Posts Plugin for WordPress, Blogger...