Showing posts with label culture. Show all posts

Friday, June 9, 2017

Egyptian Feast and Treasure Hunt

This celebration was so much fun. While planning it, I found so many awesome ideas that I DIDN'T want to do (complicated/expensive/time-consuming)—elaborate parties like this—but I had a lot of fun browsing around anyway. And luckily, I was able to compile enough fairly simple things from those resources, that we were able to have a great time! You can find a lot of the ideas we didn't use on my Pinterest Board.
The children dressed up in Egyptian costumes and wore all their jewelry (well…the girls did, anyway). And here was our menu (complete with totally inauthentic "hieroglyphs" and lame "Papyrus" font):
We love hummus and I make it fairly often, but anytime I run out of tahini, it takes me a long time to get again since I often don't see it at the regular grocery store. So, I was happy to find this recipe for hummus without tahini. I think I just needed…permission, or approval, or something, to do this. Because it's perfectly fine without tahini! Really good, in fact! I put in some sesame oil to see if I could get some of that sesame taste back, and I think a little peanut butter might also be good…or even sesame seeds!

The "yogurt Thoth" is just a joke for the older boys because they always joked that the god Thoth sounded like someone trying to say "sauce" with a lisp. Really it was labneh (sort of like a really thick yogurt cheese?), which we love almost as much as hummus with our pita bread. Or naan. Yum!

And Pie of Horus! My own invention! Not the pie, just the name. I had been wanting to make a pink lemonade ice cream pie and this celebration night seemed just the time. I was very pleased with myself for calling it Pie of Horus, as it seemed to strike just the right note. Ha ha.
It really was a most lavish feast! And I even got gold plastic plates for the occasion. So fancy!

But the very BEST thing I did for this party was have Abraham (my 14-year-old) be in charge of a treasure hunt. I knew we should have some sort of hunting-for-ancient-treasure activity, and Abe is so great with that sort of thing! He made it so fun, with coded hieroglyphs and riddles in the clues, and the younger kids LOVED it.
Hunting for treasure!
Totally clueless. But thrilled.
Abe hid the treasure-filled sarcophagi in the shed.
Inside, I had wrapped up stuffed animals like mummies, in toilet paper. (This was quite fun to do. You have to be really gentle with your wrapping or it will tear, but I found it strangely satisfying.) I drew faces on the front of them, like you'd find on a sarcophagus.
Each person's favorite animal! Oh…you can't tell what they are? Ha ha. I should have had Sam draw them. Penguin, elephant, monkey, bear, pig, owl.
I had used a gold-foil tablecloth to wrap up these "sarcophagi" made from cardboard boxes, with appropriately dire warnings for those who disturbed the treasure. If you can't do this during your Ancient Egypt Unit, when CAN you do it? One of the boxes was also filled with gold chocolate coins, and other candy "jewels." The children thought it was all so exciting and fun!

And then we watched "Prince of Egypt" while we ate our pie. It was a great end to our Ancient Egypt Unit!

Wednesday, May 31, 2017

Making Egyptian jewelry

There are many, many good ideas out there for making Ancient Egypt-style jewelry! And we tried several of them. I never thought I would voluntarily have my children do an art project involving spray-painted macaroni, for example, but we found these cool-looking snake-y cuffs to make…and then the variant looked so pretty here…that I swallowed my objections! Anything is better with gold spray-paint, it seems. (And we went through a couple cans of it during this unit!)
Here's a page showing how to make Egyptian collars. A variation is here. We used lids to some take-out containers we had, since they were a little flatter than paper plates, but either would work. You can just use anything you have on hand to decorate them (if you balk at macaroni…ha ha) and we have a huge box of these jewel-y sort of things, so that's mostly what we used.

Maybe my favorite thing we made were these circlets with the royal serpent sign. (This same site shows a pretty variation on the armlets/cuffs.) They are just so simple and elegant, I think. The girls could not WAIT to wear them for our Egyptian celebration!
The boys liked wearing theirs too. But real Pharaohs don't smile, of course.
Here is my very favorite collar—the one Sebastian made. It looks geometric and cool, but upon closer examination you can see it is a road- and sign-themed piece of jewelry. Sebastian, as you may remember, really loves roads and road signs, so…naturally…he would make his Ancient Egyptian jewelry reflect this interest. You can see he has included: stop signs and yield signs, flashing "caution" lights, lane lines, bridges, and an impressive array of every type of common traffic light including the "left turn on arrow only" versions.

Oh, Sebastian. How I love that boy.

Monday, May 29, 2017

Making Egyptian Amulets

We saw this idea about how to make an Egyptian amulet (hint: you just use air-dry clay, ha ha) and knew it would be a fun project. We had just been listening to a P.G. Wodehouse audiobook (this one, to be precise) which featured, quite prominently, a stolen Egyptian scarab (of the 4th Dynasty), so the children were all quite pleased to be able to make our OWN scarabs.

The air-dry clay isn't the MOST sturdy of media to work with, but it was at least easy to mold, and we all liked our finished amulets. Malachi may have liked his lucky owl most of all. He wore it around for several weeks and said it brought him great power and good fortune.
Sebby's monkey amulet (or "monkulet")
Junie's bunny
Some ankhs and a scarab.

Friday, May 26, 2017

Making and using papyrus

One thing I remember pretty clearly from my grade-school years is the time I made my own "papyrus" for a school project. I don't remember it all THAT clearly, I guess, but I do remember that I used iris leaves, and it took a lot of experimentation to get them soft enough—seems like maybe I ended up using the blender? And then baking the sheets in the oven?—and it never really turned into great paper. But it was fun, I remember that! For this unit, though, I wasn't really planning on trying to make paper because we had done it recently when learning about Japan.

But…while we were gathering the reeds for our reed boats, we found some of these nice wide-leaved water plants which seemed like they might be kind of like papyrus…because they had white pulpy stuff inside, and seemed buoyant. So, we decided just to experiment a bit.
With real papyrus, you'd scoop out the pulp and just use that for your paper, I think. But we just wove the whole reeds into a kind of mat and then pounded it with a mallet. Seb quite enjoyed that part.
It got all pulpy and you could see the fibers sort of fuse together as it dried.
And once it was fully dry, it was possible to write on our "papyrus"…though not really easy. Still, it was fun to visualize the process a little better by doing this activity.
I also ordered some actual papyrus so the children could see and feel what it was like. Much nicer than our "homemade" version, of course! And it was fun to write on it with brushes. We attempted to write our names using hieroglyphs, though the more we learned about that written language, the more we realized how complicated it was and how we didn't really "get" it with our letter-for-letter Western view of things! Still…fun to try it.

Here's an overview of the Egyptian numbering system we used, too.

Monday, May 22, 2017

Making Egyptian Pharaoh Death Masks

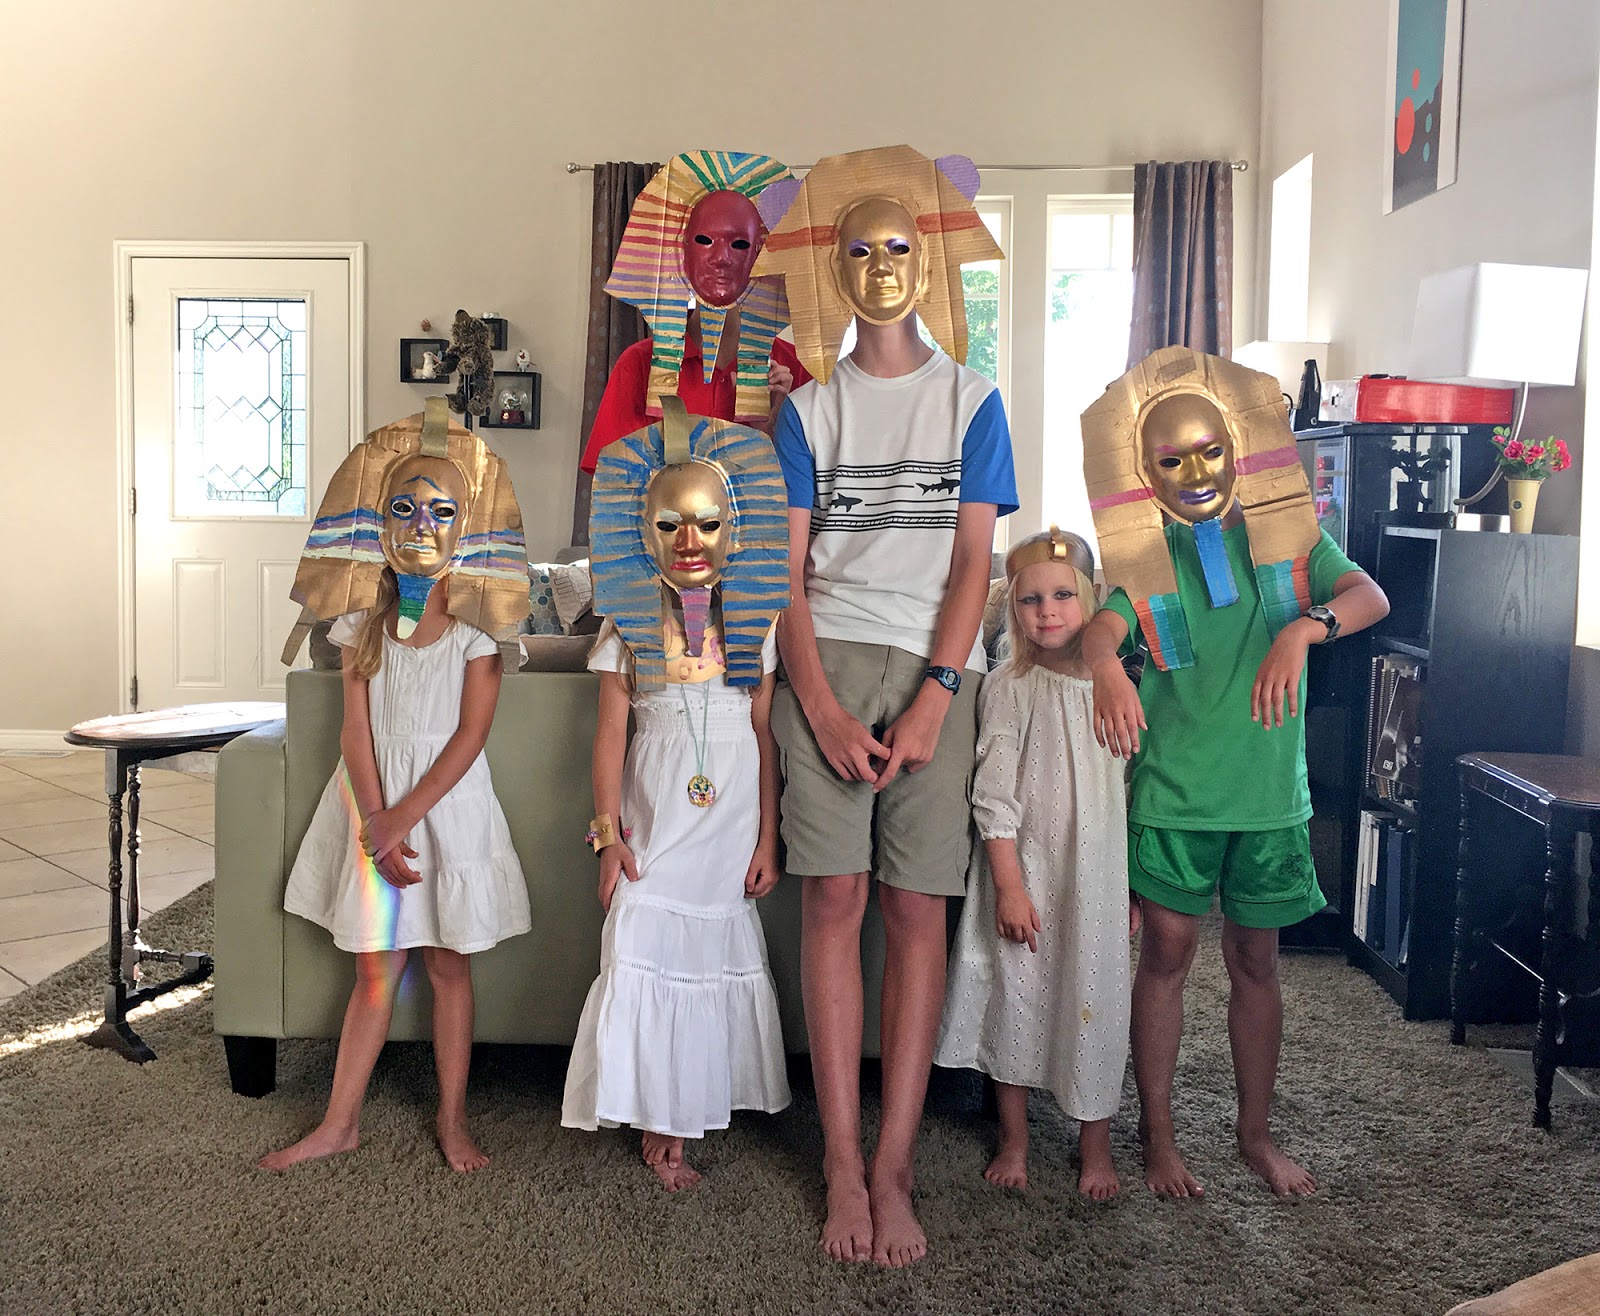
This was one of the coolest crafts we have done, I think—I mean, the final result is just so…funny and weird and impressive all at once, don't you think? I got the idea for the masks here. Like the lady at that link, I just ordered paint-your-own masks from Oriental Trading Company (find them here) an the kids spray-painted them gold and then painted with acrylics on top of that.

I had just torn a couple of ligaments in my foot the day before we did this project, and I couldn't even walk or get out of bed at the time, so I literally sat in my bed and helped the younger kids cut the cardboard, and then left everything else up to them. (This picture was taken a few weeks later.) They did an awesome job.
Junie scared the daylights out of me by standing next to my bed in the morning and I woke up with THIS FACE starting down at me. Terrifying but also somehow…awesome? :)
If you don't want to do the masks, you could also do this craft that lets the child's face show through. They are cute too. As shown here,

Monday, June 8, 2015

Japanese Garden at the International Peace Gardens

Under the red torii gate
We've visited Japanese Gardens in Denver, Portland, and San Francisco, but I was hoping we could find some kind of Japanese garden around here to visit during our unit. I came across some Yelp reviews for the International Peace Gardens, which included a Japanese garden, so I looked up their website and found it here. Based on the reviews, I wasn't expecting anything too great. People said the gardens were pretty, but kind of neglected. Still, I thought they would be worth a visit.

When we got there we were pleasantly surprised! Yes, there are a few aspects of the gardens that haven't been kept up: some of the ponds are empty, and not all the beds are as well-tended as they might have been when this place was new. But it was so lovely, in spite of that! The Japanese garden was one of our favorite sections, but there are gardens from countries all over the world. The children loved running around and exploring them all! It's a great place to come on a nice Spring day. We would love to go back again, maybe with a picnic this time. We were so glad we found out about this place!
Japanese flag above the Japanese garden
It has all the elements of a traditional Japanese garden. Graceful arched bridges (painted the lucky color red)—
Stone lanterns (this one would have been on a little island in the pond, if there had been water in the pond). Daisy found this little branch and was holding it up all day and calling it her little "bonsai," in case you're wondering what she's got there.
Nicely-shaped trees. And this looked like it might once have been a little waterfall. It would be so fun to see this place with all the water features!
Another stone lantern
Abe and Goldie on the bridge
Another small red bridge, by a clump of pretty Japanese iris
And Junie found this lovely Juniper tree.

Each garden section in this park is fairly small, but the whole park covers quite a big area. Then there is an even bigger park, with playground equipment and skateboarding ramps, etc., surrounding the International Peace Gardens. It was so nice to walk around and see everything. I'll show pictures from the rest of the garden, even though they aren't really related to this Japan Unit, just because everything was so beautiful.
Switzerland's garden. Don't you love the Materhorn there?
There was a cute miniature Swiss chalet below the mountain.
This was Mexico, I think. The girls thought this big head was hilarious, for some reason.
The Chinese Garden had a couple nice pagodas, and some cool stone lion statues.
There was water in this pool!
The French garden
Greece's garden
I love this covered arbor walkway! I assume it was for Denmark, because at the end of the walkway was…
The Little Mermaid, just like the one in Copenhagen Harbor!
Daisy and Junie liked her. We wished she had some water to sit in!
The children were playing all sorts of games up by this Stonehenge-y sort of rock installation. I think they were pretending to be trains?
The International Peace Garden is a beautiful place to visit. We recommend it!
Related Posts Plugin for WordPress, Blogger...