Tuesday, November 26, 2013

Building a Geodesic Dome

Geodesic Domes are cool. They were kind of claimed by hippies for awhile, but they're cool anyway. :) We loved learning about Buckminster Fuller and all his quirky ways (such as referring to downstairs as "instairs" and upstairs as "outstairs," to more accurately reflect our position in 3D space---awesome).

To understand geodesic domes, I first turned, as I often do, to my brother Karl. He told me what a "geodesic" is---it's the arc of a Great Circle that divides a sphere into hemispheres. But, I asked him, how is a geodesic dome made up of great circles when it looks like it's made of a bunch of triangles? He suggested I dip string in sugar water to make it stiff, and then wrap it around a balloon in several great circles. Then pop the balloon to see how it forms triangles when flattened.
Hmm. That didn't work. But we got the point anyway---the triangles form from the intersection of many great circles around a sphere!

We already know how strong triangles are, and when they are combined to approximate a sphere or hemisphere, they become stronger still! They are also lightweight and have the lowest ratio of building material to area covered of any structure. You can see why ol' Bucky (I'm not being disrespectful; he preferred to be called that!) liked them.

There's a really interesting discussion of perhaps the most famous geodesic dome (which looks like a geodesic sphere!), Spaceship Earth at Epcot Center in Disneyworld. The link includes pictures of the building process of that ride, which are fascinating to look at.

I have a soft spot in my heart for geodesic domes, as my dad loved them. When I was young he built us a huge geodesic dome in the backyard, out of lengths of pipe. We covered it with a tarp and it was the coolest playhouse ever. I'm not sure why we ever dismantled it. But it left a deep impression on me. So when I saw this plan for building our own geodesic dome, out of rolled newspapers, I jumped right on it.

I was pleasantly surprised at how easy this project was. You roll up a bunch of newspapers, cut them into two lengths, and then just attach them in a prescribed way. The hardest part for us was figuring out the intersections. We attached with tape, but our joints were sometimes unstable and there were weak spots. We had skimped a bit on the newspaper rolls (they say to roll three-thick, and some of ours were only two, and on the short side also) so the weaknesses may have been exacerbated by that. We are going to build another dome as soon as we have enough newspapers saved (my mom saves them, actually; we don't get the paper) and we'll try to be more precise and careful in our rolling.
The astounding thing, to me, was just how big the structure was. Just like one of those jungle-gyms we had at my elementary school playground! Except you couldn't hang from it, of course.

It was even more fun to play in once we covered it up with sheets. It was strong enough to support them, though heavier blankets seemed to stress it unduly, so we used our lightest sheets. Again, maybe it would have been better with thicker newspaper tubes.
Marigold was brought in to play more than once, much to her . . . dismay? I'm not sure what she was thinking.
A lot of giggling and crawling around in circles ensued.
So fun! We can't wait to do this project again.

Monday, November 25, 2013

Fallingwater models

We should have actually called these houses "Fallingcracker" or "Fallingfrosting", but they are models of Frank Lloyd Wright's most famous house, Fallingwater. Can you see the resemblance? :)
I hate to be so predictable, but this is one of my favorite houses too. I know some people think it's overpraised or whatever, but it's just so beautiful. I would love to live there or even visit there.

This is an easy craft. I just made frosting (2 T. melted butter, a pound of powdered sugar, add milk until it's the right consistency), gave the children a stack of graham crackers and some pictures for reference, and let them have at it. They had lots of fun. And they saw firsthand how cantilevers need counterweights to hold them up!
We had fun.

Sunday, November 24, 2013

Architecture Charts

I like to have a record of some of the charts we draw during these units because it helps remind me what we talked about and how we talked about it. The poster on the top is Sam's, of course.

Friday, November 22, 2013

Architects and One-Point Perspective Drawings

We learned about some of the things architects do, and talked about famous architects. We watched an artsy and beautifully-filmed documentary on Norman Foster (fascinating), and we watched the Ken Burns documentary about Frank Lloyd Wright. He had kind of a sad, but very interesting, life. It sparked some serious discussions with the older boys, and both movies, with their retrospective nature, made me do a lot of thinking about what patterns can be seen in my own life, and what they mean.

We talked about the difference between elevations, floor plans, and renderings, and then I asked Sam if he would teach a class on perspective drawing. (We drew floor plans on another day.) He showed us how to do one-point perspective. The boys got the idea pretty well, though getting all the lines right (even with a ruler) can be hard---especially when you're trying to do circles, etc.! Still, it was a useful art lesson and a good introduction to drafting and rendering.
I liked how Seb's looked with the added color. I love the leafy, Art-Nouveau-style stained-glass window by the door on that far wall!

Skyscrapers and Jello Earthquakes

This was a fun activity to test different types of structures and how they stand up to earthquakes and liquefaction. We got the idea here. This would be a good thing to do in a Natural Disasters Unit, too!
We built structures using mini-marshmallows and toothpicks, trying to keep in mind the architectural principles we'd learned about what makes structures stronger (like wide foundations, triangle and truss-reinforced walls, and so forth).

Then we put our structures onto our pan of jello and shook them up to see how they withstood the earthquake! Fun.
The taller structures were definitely harder to keep stable!
There was one among us who did more eating than building, unfortunately.

Thursday, November 21, 2013

Skyscraper Foundations

We liked our bridges book so much, we got the companion volume on skyscrapers. It had some great information on the different types of foundations and footings used for skyscrapers on different types of soil. We did this demonstration of how concrete piles in the foundation manage the tower's weight by distributing it among themselves. It works the same way as lying or stepping on a bed of nails! You can see we put toothpicks all throughout this clay "soil," above. A building built right on the clay would slowly sink into the ground. But with these piles making up the foundation. . .
the building is very well-supported!

\\
We varied this a bit to demonstrate how the weight of a skyscraper is distributed more on the outer edges---allowing "tube" tower construction which makes for very strong towers, such as the Willis tower in Chicago. You can see how if we remove the inner piles, as above . . . 

The outer ones alone are able to support the structure! When we did the opposite thing (removing piles from the outside, leaving only a mass of piles in the center), the piles collapsed under the same load.

Wednesday, November 20, 2013

Elevator Model, and the Safety Elevator

Steel was an important advancement that made taller and taller skyscrapers possible, but equally important was the invention of the safety elevator by Elisha Otis. Tall buildings are not useful unless there are elevators to get people and equipment to the uppermost floors, and no one was willing to ride in elevators until a safety brake was invented! We made a model of an elevator (no safety brake, though!) which was pretty fun.
Arc de Triomphe is going up in this elevator
We absolutely loved this video, in which a guy makes his own model elevator and demonstrates how the safety brake works. I wish I knew how to just build things like this in my garage!

After learning about elevators, we have been noticing how many elevators still are made by the Otis Elevator company. Practically all of them! You can look for the "Otis" logo next time you ride an elevator.

Tuesday, November 19, 2013

Paint-chip City Skylines

I found this image showing city skylines using paint chips, so we decided to try it. The paint chips I had weren't very long, so if I were doing this again I might go in search of longer, more vertically-oriented paint chips, but ours worked fine. We talked about cities and how skylines change over time, and watched this video of the growth of a city.

I told the children they could make any types of buildings they wanted, real or imagined. :)
Seb's city is on a hill, which is why there are those houses up above the skyline in the distance. There's a suspension bridge in the foreground.
I like Abe's space-needle-like tower
Daisy's skyline, with sun and moon
Malachi's skyline, with one unimaginably huge tower, and a rocket blasting off above.

Monday, November 18, 2013

Skyscrapers

After bridges, we spent an entire week on skyscrapers, as this was another area I knew the children had great interest. And who can blame them? Tall towers are just amazing!
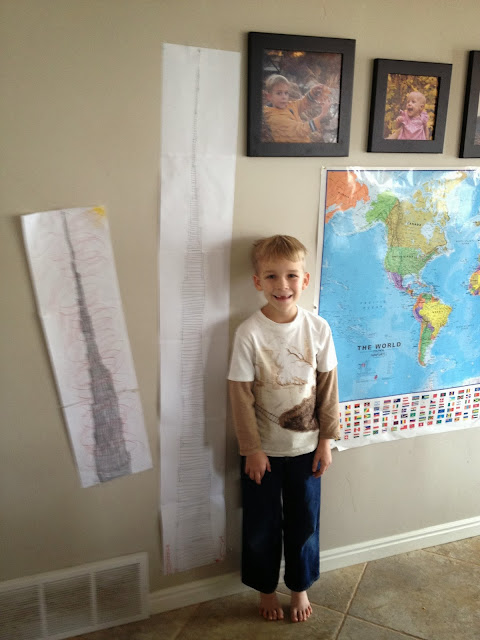
Seb has always loved the Burj Khalifa, and has been drawing it ever since he was a small(er) guy! The picture on our left is another version of the Burj Khalifa, this one in a whirling sandstorm.

He still builds it regularly with blocks, too.

It's such a beautiful building! It would be amazing to see it in person.

Anyway, here are some resources we found for our skyscraper week.

This looks fun, but we didn't have the materials for it. 

We considered doing this to-scale city skyline too, but ran out of time. I think we may do it another time, as images like this and this are something the boys really enjoy poring over.

We watched this documentary about Dubai---dramatic in kind of a funny way, but interesting :)

This is fun---it shows the window-washing robot that washes the windows of the Sears (now Willis) Tower.

I loved this article, about the progress on the new World Trade Center (called One World Trade Center) in New York City. You can see a time-lapse video of its construction, too.

This is a documentary about the construction of One World Trade Center. Inspiring.

Friday, November 15, 2013

Moveable Bridges

Even though they aren't that commonly used, moveable bridges are so interesting! We loved learning about them. Bascule Bridges (drawbridges), Vertical-Lift Bridges, Swing Bridges, and Transporter Bridges are the types of moveable bridges we talked about.
This is a swing bridge. The entire center span can rotate 90 degrees to allow boat traffic through, and then rotate again to complete the roadway. We made this easily with a cardboard span attached to a goat-cheese container lid with a brad. We filled the pan with water so our boat could float through.

Transporter bridges, our book said, are hardly ever used anymore. They move across two suspended cables almost like a horizontal elevator. The entire span or platform moves to transport cars across a small river or gully.

Partially lifted
This is a model of a vertical-lift bridge. When the bridge is down (I don't have a picture of this), cars can go across the span, which stretches between two pillars (the Wheaties boxes) like a regular bridge. When boat traffic needs to pass, the entire span lifts up vertically through a system of pulleys. Then boats can pass underneath with no obstructions in the water (bottom picture).

Our favorite double-leaf bascule bridge is Tower Bridge in London, and we watched a video of it lifting. This site also has an animation of both single- and double-leaf bascule bridges at work.

Thursday, November 14, 2013

K'nex bridge set

I bought this K'nex Bridge Set for our architecture unit, hoping it would be fun enough to justify the expense. We have LOVED it and I'm so glad we bought it! (Hey, it's even on sale right now!) The children had tons of fun putting together all the different types of bridges, and it was a great hands-on illustration of how each type of bridge supports its load. The k'nex pieces hold together nicely and are quite sturdy---we had one of the tiny arms snap off of one segment, but there are enough extra pieces that it didn't matter. The instructions are fairly easy to follow, and when the bigger children helped the littler ones, everyone was able to participate. It worked quite well to have Seb and Daisy putting together one section, and Abe and Ky putting together another at the same time.
Arch bridge
We especially liked the way this bascule bridge actually moved up and down!
Cable-stayed bridge
Cantilever bridge
Truss Bridge
Suspension bridge
Related Posts Plugin for WordPress, Blogger...