Monday, April 21, 2014

Power Stations and Transformers

It was quite interesting to learn about the electric grid and how power stations distribute electricity. We really liked the book Wired and there were several other good ones at the library as well. We have talked quite a lot about hydroelectric power and how it generates electricity, and about nuclear power and how it generates electricity, but we hadn't really talked about what happens to that electricity once it has left the power plant, so that was cool to learn.
Once we'd learned about electrical substations, we started seeing them everywhere, which was quite exciting, as I'm sure you can imagine. :)
Here's a video about how transformers work, although I think we had a book that explained it better.

This movie was also interesting, about how "the grid" is powered

Here's a virtual Power Plant Tour you can take

Friday, April 18, 2014

Lights On and Lights Off---Making slider cards


We spent a whole day on Edison, and a whole day on Tesla, but there was so much to talk about that we spent yet another day talking just about electric lights. It was really interesting to learn about types of lights and some of the newer innovations in lighting (CFLs, LEDs, etc.)
I wanted to take a bit of a break from doing electrical activities and circuitry (not that the boys needed a break; they could make models and do snap circuits all day every day, but I try to keep things well-rounded) :) so I thought we would make little slider cards that showed a light going on and off. It was fun to see the variations the children came up with!

A very easy and precise how-to video on how to make the slider cards is here. They aren't hard to make, but I still had to make one myself before I really understood how to do it and where to place all the different parts. Once we got it, it was really fun and we even made some extras!

Here is another slider card tutorial.

And here are some resources for learning about light bulbs:
How CFL bulbs work
How LEDs work
How fluorescent lamps work
How incandescent bulbs are made

Thursday, April 17, 2014

Homemade Light Bulb

This activity was really, really fun, and quite spectacular to watch. On the day we learned about Thomas Edison, we made our own light bulb! I didn't even know you could do that. But all you need is some electricity (8 D batteries), a holding apparatus of some sort, and a resistant material (mechanical pencil leads work perfectly). Thomas Edison, we read, tried something like 1000 different materials before coming up with a practical light bulb, so don't give up if this doesn't work the first time. :)
First, rig up your apparatus. You are just making a circuit with the pencil lead in the middle of it. So tape an alligator clip to one end of your line of batteries (which should be taped end to end), and run the other end of the wire up one side of a toilet paper tube or something similar. Clip one end of the pencil lead carefully into the "jaws" of the clip. Attach another alligator clips's jaws to the other end of the pencil lead, run the wire down the other side of the toilet paper tube, and tape the other end of the second alligator wire to the other side of the batteries, forming a complete circuit. Now your pencil lead should be suspended like a filament over the top end of the toilet paper tube. Put a glass jar upside down over the top of the whole thing.
As electricity runs through the circuit, the pencil lead will resist the current and begin to heat up and glow. This doesn't take very long (a minute, maybe?) so if doesn't start happening soon, check your circuit with a tiny light bulb or something, to make sure all the batteries are touching each other and none of the wires are faulty. It should start to smoke a bit and then glow quite beautifully.
After a short time, the pencil lead will glow very brightly and then get too hot and melt. It will break apart, opening the circuit, and that's the end of your light bulb. But you can always put in a new pencil lead and try it again and again! :)
The children were just mesmerized by their glowing homemade bulbs (and they liked the smoke and the flash as they burned out, too). This was definitely a favorite activity!

When we went to the science museum in Portland, Oregon recently, we got to see one of Edison's original bulbs (one of the ones that didn't work very well). We also saw a model of the successful bulb he made later. It was really cool to see!

Here's a video about Thomas Edison.

Speaking of Edison, here's a video that talks about the differences between AC and DC, and the contributions of Edison and Tesla to each.

Wednesday, April 16, 2014

More train drawings and paper models

Here is an update on this post about model paper trains. Seb is still loving to make them, and has done the paper models so many times, he can now make up his own. Above is the train he made for Malachi, with the very exotic and French-sounding name of "Lu Pinkx." :)
A model made with mostly glue instead of tape (it takes longer and is fussier to make, but it looks nicer)
I also really like these ink drawings Sebastian did of various types of trains. He got some greyscale markers for Christmas, and Sam showed him how to use them for shading. I love seeing what Seb draws with them!
And here's my favorite thing of all---this Bunny Train which Sebby made me for Mother's Day. I love it!!

Tuesday, April 15, 2014

Electricity and Magnetism Supplies

For this unit, we had some of the basic components we needed on hand, and I ordered a few more. I was wishing someone would tell me all the sorts of things I would need so I didn't have to figure it out myself, and so I wouldn't be caught without something we needed. For that reason, I give you this list. You can pull batteries out of flashlights and improvise bulb holders, etc., but if you're a beginner and need guidance, I think the following things made up a pretty good basic electricity exploration set:

Alligator clips--get several so you can make different kinds of circuits
Tiny light bulbs--These work well with D batteries as the power source, and light bulbs are the easiest way to test if a circuit is working or not! Again, getting several will let you construct parallel and series circuits, etc. Also, it's nice to have extra in case you burn some out.
Bulb holders--Not totally necessary, but so much easier than holding or taping the contact of the wire to the bulb base!
Insulated copper wire--Nice and safe, but you'll have to scrape the insulation off the ends for your contact points. If you have the right tool (wire stripper?) it's probably fine, but we didn't. I finally used a butter knife (too sharp of a knife will just cut the wire!) to scrape-scrape-scrape, and that worked pretty well.
Bare copper wire--sometimes you want bare copper wire, like if you're making a dimmer switch and want to be able to connect the circuit at any point along the wire.
Magnet wire--good for making motors
6-volt battery--I like this because the terminals are so accessible and easy to clip wires to! 
D batteries--It's good to have a bunch of these on hand
Carbon-zinc batteries--safe for dissecting!
LEDs and resistors--fun to use in circuits, but because they use so little voltage, you sometimes have to use the included resistors as well (a 9-Volt battery will burn them out instantly)
Mechanical pencil lead---for a homemade light bulb

For exploring magnetism, any old magnet will do, but we also found these supplies really fun:
Iron filings--for sprinkling on paper or putting into oil to make magnetic fields visible, or just for giving your magnets funny furry beards. They're kind of messy but SO fun! And much easier than the "steel wool shavings" many instructions suggest substituting
Basic bar magnets--marked with North and South Poles
Horseshoe magnet--stronger than the bar magnets, and makes a different kind of field

I generally think getting things in "sets" is a waste, since they inevitably include things you don't need/don't like/are flimsier than you would have gotten separately---but these both looked pretty good, so we also got these two sets:

Motors and generators kit--because making the coils of wire big enough and sturdy enough to work in a generator is pretty hard, and this has that part done for you. You can see how the motor and the generator work in reverse of each other, and the magnets snap on to the sides so nicely. We thought this kit was very easy to use, while remaining useful because you can tell what's going on!

Maglev Kit--This probably could be made without a kit, but there was no way _I_ was going to be able to figure out all the components. And because my children LOVE maglevs, and had been wishing and wishing to make one during our Train Unit, I thought this kit would be worth our while. The maglev was really fun to make, and although it needs some adjustment to run perfectly (sanding off the sides, making the weight balance perfectly, etc), the process itself is fun enough to be worth it.

Also contact cement--you need this to go with the Maglev Kit

We also have (and love) this Snap Circuit set---and there are lots of other sets that look fun too! Someone gave us this one specifically about electromagnetism, and it's fun, but not that great on its own. I'd recommend the set above instead, because it does a lot more.

Friday, April 11, 2014

Resistors and Switches

After making some simple circuits, we were ready to learn about resistors. First we made a simple "dimmer switch" using a wire coiled around a pencil. (See here for supply list.) As you move the connection up and down the coiled wire (allowing the current to either go through a lot of wire, or just a little wire), you adjust the resistance and the light gets brighter or dimmer accordingly.
We also made a circuit that included a large piece of paper towel. The paper towel provides enough resistance to the current that the electricity doesn't even get through, and the bulb won't light. But if you wet the paper towel, it provides less resistance (water helps the paper towel become somewhat of a conductor) and the bulb lights---dimly. If you sprinkle salt onto the wet paper towel, you decrease resistance even further and the light glows quite brightly!
Next, we experimented with switches. Here is a simple on-off switch using a paper clip.
My favorite was the three-way switch, which is a concept I have never before understood. This is like a room in your house where there are two switches (one at each end of the room) to turn on the same light. Here's how it works: there are basically two circuits, a short one and a long one, and two switches that toggle between the two circuits. If one switch is "up" and the other is "down," neither circuit is complete and the light is off.
If both switches are "up," the shorter circuit is complete and the light turns on.
If both switches are "down," the longer circuit is complete and the light turns on.
Amazing, eh? I love it.

Thursday, April 10, 2014

Making a Leyden Jar and Static Zapper

This could go with a discussion of static electricity, but since we talked about the invention of the Leyden jar when we discussed the history of electricity, we made it on a different day. The Leyden Jar is named after the university where it was first used (you say it "LIE-den" jar, if you are wondering) :) and this Robert Krampf video shows how to make one. It's basically just a device that can store and release a static electric charge---i.e., a simple capacitor. For our Leyden Jar, we covered the inside and the outside of a plastic cup with foil, and then made a long snake of foil coming out from under the inside foil. You charge the jar up using static (we rubbed a balloon over Malachi's hair 40-50 times and touched it to the collector, the ball of of foil at the end of the snake. You cAn hear a kind of crackle as it's working.) and then you can discharge it when you touch your finger, or another foil snake, to the collector ball. It's quite fun to see how much charge you can build up (Robert Krampf says it's 25,000 volts!)
You can even see a tiny purple spark in this picture!
This "zapper" works the same way, but this time it's made with a styrofoam cup and plate and a foil pie pan. Directions for making the zapper are here.

Wednesday, April 9, 2014

Simple Foil Circuits; Series and Parallel Circuits; Schematics


There are a lot of cool electronics kits you can get, and in fact we had been given some snap circuit kits earlier in the year, which I'd been saving for this unit---so we could have just started right in on those. I read lots of reviews on the snap circuits talking about how educational they were, and they ARE wonderful and we have loved them---but---my one problem with them is that they are somewhat far-removed from the actual workings of the electricity. By that I mean, all the actual wiring is enclosed in snap-able components, and while that makes for ease of use, it also makes the workings of the electricity somewhat more opaque (at least to me). I think once you understand what is going on, snap circuits are great, but for an introduction to circuits, I think there are better illustrations.

So, we started with what seems to me the very most basic form of a circuit: foil and a battery! (Here is a how-to video about foil circuits, if you need it.)
First we felt how the foil gets warm as a current passes through it
Then we added a tiny light bulb and watched it light up as electricity went through the circuit! (I will have a separate post about the materials we used for this unit.)
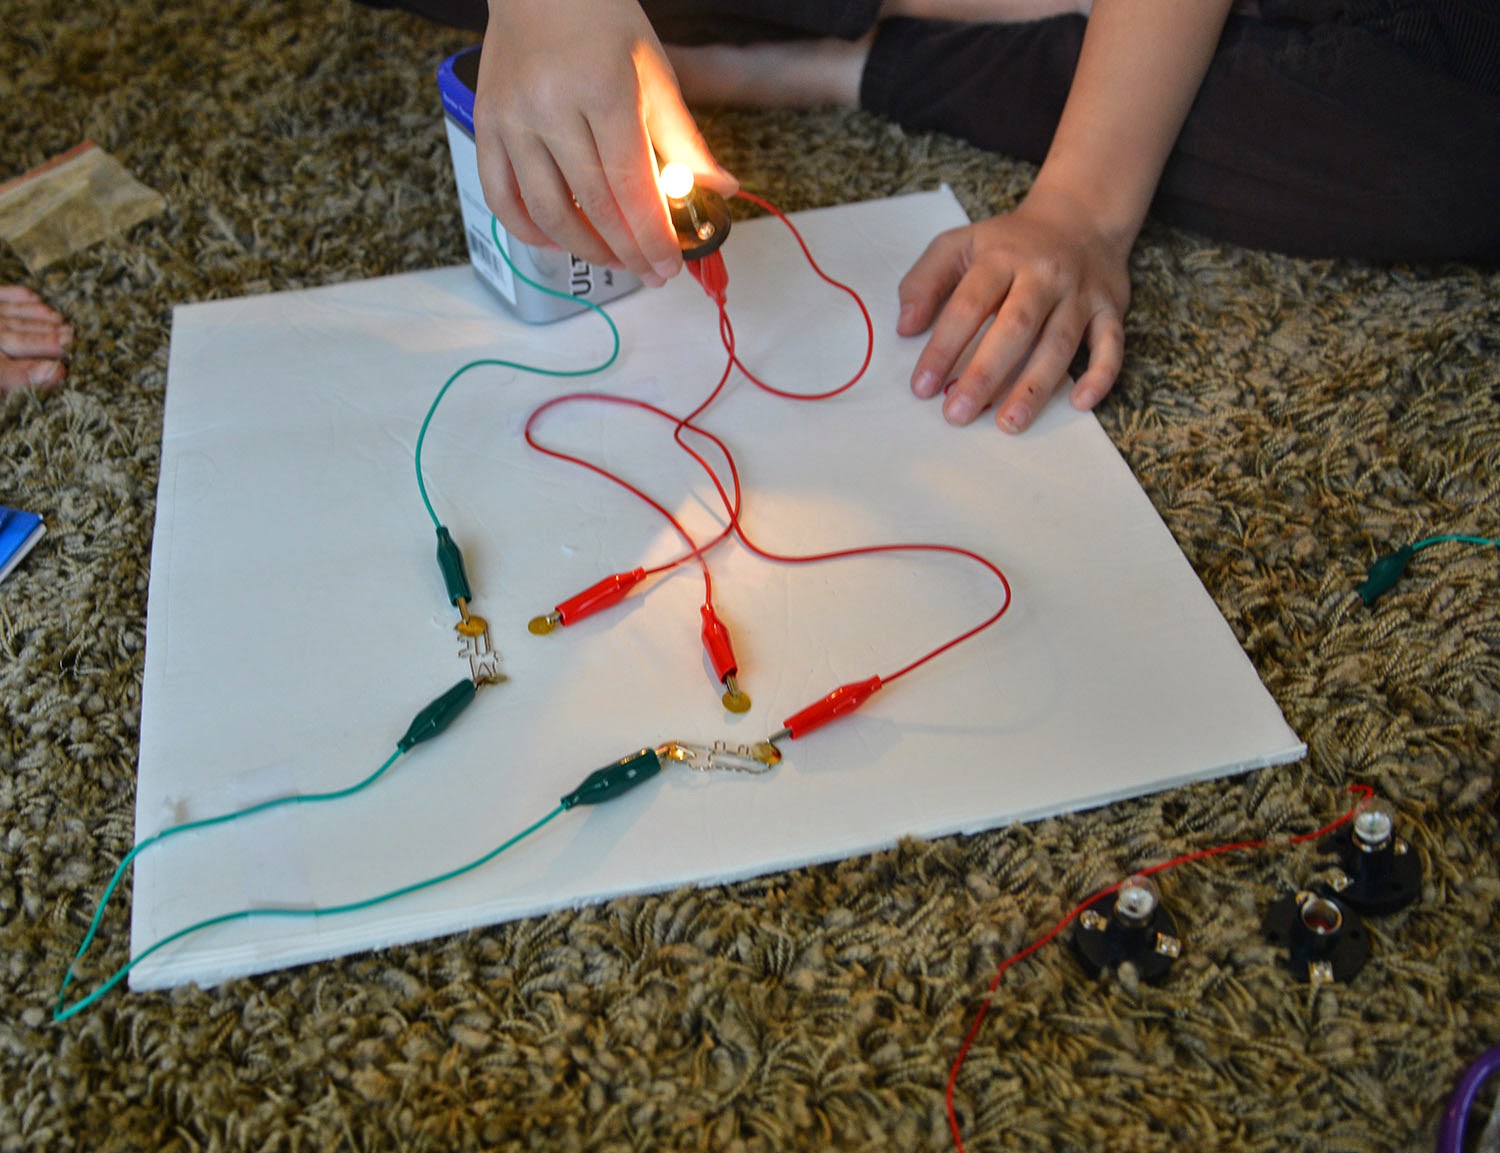
Next we set up circuits with batteries, bulbs, and alligator clips. We tried various configurations and learned about parallel and series circuits.
Parallel Circuit---note that the bulbs have the same brightness
Series Circuit---note the progressively dimmer bulbs as the current becomes weaker
The children also copied down a list of symbols used in wiring and circuitry schematics. They loved this---it's like a secret code!

Here are a few more resources for circuit symbols:
http://www.itclips.net/2012/04/03/going-from-schematic-to-breadboard/
http://dccircuit.wikispaces.com/01+Circuit+Symbols
http://guides.machinescience.org/mod/book/print.php?id=1312--scroll down on this page to see how a seven-segment display, like you see on digital clocks, etc, works. Very interesting.

Here's a short video about circuits

Also, these circuit worksheets from Teachers Pay Teachers are fun.

And we thought this article about circuits in your house was really interesting!

Monday, April 7, 2014

Electric current, Conductors, and Insulators

After static electricity, we went on to current electricity. First we played a game where we showed how current flows (emphasizing the point that it isn't a thing that moves along, but energy--an impulse). Everyone held a stuffed animal and we pretended the animals were electrons. You were only allowed to hold one animal at a time, so when I introduced an extra stuffed animal into the system by handing it to one of the children, they had to hand off their other animal to make sure they still only had one. We passed the "current" along the line, and then talked about how if the energy goes down a line, it has to stop when it reaches the end. But if it goes around in a circle, it can keep flowing and flowing. We also showed how an insulator works---if you insert another person into the circle, and that person CAN hold more than one electron, then when the current gets passed to him, he just holds onto it and it stops. In our game, people who easily pass electrons along are conductors, and people that hold onto electrons (or don't accept new ones) are insulators.
Then we did a lab testing different materials for their heat-conductivity. (Idea from here.) We boiled water, then poured it into identical glass jars that were wrapped with various materials, and noted the starting temperature. We then measured the temperature of the water after 20 minutes to see how much heat was kept in by the wrapping. (Our wrapping materials were foil, bubble wrap, fleece [I put felt on the lab sheet, but I couldn't find my felt so we used fleece instead], cotton cloth, paper bag, wrapping paper, and water---the jar of water was in another, bigger, jar of water.)
Here is the Lab sheet I made for us; feel free to use it.
We had a lot of fun testing these things and even some surprises (the foil was a lot better insulator than we predicted---maybe because of the air trapped in its wrinkles? or its thinness?).

Friday, April 4, 2014

Static Electricity and Ions

We started this unit with static electricity, and to understand that, you first have to understand ions. We learned about ions when we studied nuclear energy, but it was good for us to review it. (I think I finally have it down now, but I tend to get ions and isotopes mixed up, so a reminder is always helpful for me.) We made little diagrams using fwuffballs to represent the subatomic particles. We showed how an atom losing an electron could create charged particles, either positive or negative.
There are lots of fun things you can do with static electricity and a balloon. There's picking up tiny bits of paper, of course . . .
Or making a stream of water bend
Or sorting salt and pepper (if you get the balloon just the right distance away, the lighter pepper jumps up to the balloon while the heavier salt remains on the plate).
You can repel a piece of tape with another (rubbed) piece of tape
But maybe our favorite thing is just making people's hair stand up!

Also, here's a nice video of a lightning strike.

Thursday, April 3, 2014

Electricity and Magnetism Unit Schedule and Lesson Plan

The children really, really wanted to learn about electricity, so I finally buckled down and planned this unit. It seemed like a really overwhelming subject to me at first (and it is, even if you're just doing the basics like we were), but it got easier as I went along. I realized as I was preparing that electricity and magnetism really go together, so the Electricity Unit grew into an Electricity and Magnetism Unit. All the better! We love magnets. :)

Here's a list of most of the materials you need for this unit, plus links to buy them online.

Below are some electricity and magnetism resources that didn't fit anywhere else. You can also look at my Electricity Unit Pinterest Board.

I really had to do a lot of reading before I FINALLY got it straight in my mind what the difference between volts, amps, ohms, and watts is. Here are some resources for that:

http://science.howstuffworks.com/environmental/energy/question501.htm

http://www.candlepowerforums.com/vb/showthread.php?9200-Amps-vs-Watts-vs-Volts

http://www.ducksters.com/science/electricity_102.php---some good electricity basics

http://www.physics4kids.com/files/elec_current.html

Robert Krampf's electricity show is really fun (subscription required---it's worth it! We love Robert Krampf and use his site all the time)

We loved this interactive animation for helping us understand AC and DC.

And here's a video that talks about the differences between AC and DC, and the contributions of Edison and Tesla to each.

LOVE this video explaining transistors and semiconductors. So clear!

Building a telegraph looks fun---we did something similar with the snap circuits. This could go with a lesson on the transcontinental railroad, too.

We spent a day talking about electricity in animals (we had some good books on the subject) and this article was interesting too.

And here's a short video about electric eels
Seb's illustration of the electromagnetic spectrum

Related Posts Plugin for WordPress, Blogger...